ArticlesComments Off on About The Peninsula Barracks Site
Jan042012
About the Peninsula Barracks Site
[jwplayer mediaid=”8100″] (Secunderabad (Please Play Me)
On this historic site, on which The Royal Green Jackets ( Rifles) Museum stands, William the Conqueror built a royal castle (1067), which was extended by King Henry III (1216-72). The castle was besieged by Oliver Cromwell during the English Civil War (1645) and, after its occupants had surrendered, was partially demolished in 1651.
In 1683 King Charles II chose the site for a palace overlooking Winchester Cathedral. The palace was designed in the manner of Versailles by Sir Christopher Wren, but, following King Charles II’s death (1685), it was never completed. In the 18th century the palace, known as The King’s House and in an increasingly neglected state, was used to accommodate French, Spanish and Dutch prisoners captured during the Seven Years’ War (1756-63) and the American War of Independence (1775-83).
The Kings House, centre left, with Winchester Cathedral in the middle distance, 1838
In 1796 the site was leased from the Crown for use as a military barracks. Thereafter:
1796-1856: The barracks housed 3,000 troops during the Napoleonic Wars and numerous regiments temporarily between 1815 and 1856, including the 43rd Light Infantry and the 60th Rifles (King’s Royal Rifle Corps).
1839: The main railway line from London to Southampton on the western boundary of the barracks was opened with a platform available for use by the troops in the barracks.
1856: The 2nd Battalion, The Rifle Brigade, arrived from Portsmouth.
1858: The barracks became the home base and training depot of The King’s Royal Rifle Corps (KRRC) and The Rifle Brigade (RB).
1872: The barracks was officially titled The Rifle Depot.
1894: The King’s House was destroyed by fire. The depot was closed and the troops moved to Gosport while the barracks were rebuilt.
1899: The Prince of Wales (later King Edward VII) laid the foundation stone for the new barracks. 1904: The Rifle Depot re-opened with The King’s House re-built in similar style to Wren’s original design.
1914: At the outbreak of the First World War 5,000 reservists were mobilised, clothed, equipped, armed and posted to their regiments in five days. Subsequently 30,000 volunteers destined for service in the KRRC and RB passed through the gates of The Rifle Depot by the end of September 1914.
1939: At the outbreak of the Second World War so many recruits came forward to join the KRRC and RB that it became necessary for the KRRC recruits to be trained at Bushfield Camp, two miles outside Winchester.
1943-4: The barracks were vacated by The Rifle Depot and used to house the 60th Infantry Regiment of the 9th (US) Infantry Division which was preparing to take part in the 1944 D Day landings in Normandy. RB recruits were trained near York.
Churchill addressing US troops at The Rifle Depot, 1944.
After the war recruit training resumed at The Rifle Depot.
1951-86: The Rifle Depot was variously re-titled: The Green Jackets Depot (1951-58); The Green Jackets Brigade Depot (1959-65); The Rifle Depot (1966-82); and The Light Division Depot (Winchester) (1983-6).
Between 1961 and 1964 the Depot moved to Bushfield Camp while the barracks were modernised.
1986: After completion of a new barracks at Flowerdown on the outskirts of Winchester (Andover Road), the barracks ceased to be used as a training depot.
1994: The Ministry of Defence relinquished its occupation of most of the site for private residential use, with the area of the former parade ground landscaped and renamed Peninsula Square. Three buildings were retained to accommodate some MOD offices, including the Regimental Headquarters of The Royal Green Jackets, and Winchester’s Military Museums.
Today the site continues to accommodate some MOD offices, including the Regimental Headquarters of The Rifles, and Winchester’s Military Museums. Peninsula Square with its smart houses and landscaped gardens is also one of the most desirable places to live in Winchester.
The Barracks today
looking onto the Waterloo water feature
More information about the history of the site and how it relates to the wider history of the City of Winchester is available in Winchester’s Military Museums Visitor Centre and in the City Museum.
The King`s House in Winchester was a late 17th century planned Royal Palace in the English county of Hampshire. Winchester had been the capital of Wessex and England in Anglo-Saxon times, but became a backwater after the Norman Conquest.
Built for King Charles II of England by Sir Christopher Wren from 1683, the King’s House stood on a site adjoining the castle it was to replace, and modeled after the Palace of Versailles, though on a somewhat smaller scale. It was to have sweeping views, walks and gardens descending to the cathedral. Although structurally completed, money ran out and the project was eventually abandoned. The building was gutted by fire in 1894 and demolished.
Columns and parts of the decorative masonry were reused in the superb Peninsula Barracks building which replaced it in 1900.
[jwplayer mediaid=”8106″] (Sambre Et Meuse (Please Play Me) [slideshow id=4]
We all remember our first time at Peninsula Barracks; the training, and nights buffing up the floors, spitting and polishing our boots, letters home and the odd phone call. friendships formed.
Just by chance I was given some picture post cards by a fellow Rifleman, dating back from 1902 to 1917. Back in those days, this was probably the only form of communication the Riflemen, our forebears would Probably had at this time.
On the picture post cards, are pictures of the old Peninsula Barracks with drill being taken, and how the square looked back in those days, the post cards are all originals, and you can read the writing on them too. I hope you all enjoy viewing them…
ArticlesComments Off on A little bit of History in time line formation
Sep212011
Time Line Formation
The Green Jackets and the Royal Green Jackets were the fastest mechanised Infantry Regiment, marching with a pace of 140 to the minute, not bearing Colours and responding to the sound of a Bugle. The men of Green proudly went into service of their Sovereign and Country, earning many battle honour`s, Peninsula being one of them.
The Regiment’s lowest rank, unlike other Regiments who have Private, was referred to as a Rifleman due to the weapon that they used, the Baker rifle.
The other notable difference was that of a Sword fixed on the Rifle instead of a Bayonet.
Her Majesty Queen Elizabeth ll was the Colonel in Chief of the Regiment until their disbandment.
The lessons of the past achievements of the illustrious predecessors and traditions of those who deserve to be remembered dating back to the Napoleonic wars, Duke of York’s own Rifle Corps had a change in name to be called “The Kings Royal Rifle Corps” and it was in 1858 that the Rifle Depot at Winchester was made their headquarters.
At the time of World War 1;
The Kings Royal Rifle Corps (KRRC) had 22 Battalions over 12,000 soldiers of which 8 members won the Victoria Cross.
1922 saw the Regiment reduced and in 1926 the Regiment was re-organised to be one of the first mechanised Infantry Regiments.
1948, for the purpose of administration, the Kings Royal Rifle Corps was brigaded with the Oxfordshire and Buckinghamshire light infantry 43rd and 52nd and the Rifle Brigade to form the regiment Green Jackets Brigade.
1958 the Regiment was retitled 2nd Green Jackets, The Kings Rifle Corps, the two other Regiments of the Green Jackets Brigade were retitled 1st and 3rd Green Jackets.
N.B:
1957 The Regiment moved to Peninsula Barracks and on the 7th of November 1958 the Regiment transferred from the light Infantry Brigade to the Green Jacket Brigade.
1966, The 3 Regiments were amalgamated to form the 3 Battalions of the Royal Green Jackets:
The 1st Battalion, The Royal Green Jackets, whose illustrious predecessors were the Ox & Bucks was retitled, The 1st Battalion the Oxfordshire and Buckinghamshire the Light Infantry 43rd and 52nd.
Then there was the 2nd Battalion ofThe Royal Green Jackets, whose illustrious predecessors were The Kings Royal Rifle Corps.
Then last but not least, the 3rd Battalion ofThe Royal Green Jackets, whose illustrious predecessors were the Rifle Brigade.
1986, The Royal Green Jackets marched for the last time out of the gates of Peninsula Barracks, their ancestral home, leaving behind the forefathers of their illustrious past, which had earned them many battle honours, among them Peninsula.
The Regiments motto Celer et Audax Latin for Swift and Bold.
Those that make up the fabric of the Regiment were swift to take arms on foot and bold in the defences of our realm.
1992, in a reorganisation the 1st Battalion the Royal Green Jackets was disbanded and the 2nd Battalion the Royal Green Jackets were renumbered as the 1st Battalion of the Royal Green Jackets; the 3rd Battalion of the Royal Green Jackets, the former Rifle Brigade becoming the 2nd Battalion The Royal Green Jackets.
2007 the two remaining Battalions of the Royal Green Jackets with the remaining light infantry regiments amalgamated to form another Regiment, for the Royal Green Jackets there were no more parades.
It is fitting to mention that the new Regiment formed from the illustrious forefathers houses its headquarters in the PeninsulaBarracks, once a Castle, the ancestral home of the (Royal) Green Jackets, the newly named regiment The RIFLES.
The Green Jackets all wore the Brigade Badge with their own regimental shoulder flashers.
Green Jackets (RGJ) was an infantry regiment of the British Army, one of two large regiments within the Light Division , the other being The Light Infantry. It was formed in 1966 by the amalgamation of the three separate regiments of the Green Jacket Brigade
1 Green Jackets, (43rd and 52nd)
2 Green Jackets, (KRRC)
3 Green Jackets, (RB)
There were also two Territorial Army battalions made up as follows
4th(V) Bn Royal Green Jackets – formed from the remnants of the Rangers (KRRC), London Rifle Brigade, Tower Hamlets Rifles, Queens Westminster’s, Queen Victoria’s Rifles and Civil Service Rifles.
5th(V) Bn Royal Green Jackets – formed from the 4th Bn the Oxfordshire & Buckinghamshire Light Infantry (TA) and the Buckinghamshire Battalion of the Ox & Bucks Light Infantry re badged
In 1992 1st RGJ was disbanded and 2/RGJ and 3/RGJ renumbered 1/RGJ and 2/RGJ respectively.
The last ever Royal Green Jackets unit was the London Oratory CCF who were as Irish guards in 2010.
Their motto was Celer et Audax, Latin for: “Swift and Bold”). As they were used as shock troops and marksmen, they had to get to the front line of battle as fast as was possible; as a result the RGJ marches at 140 paces per minute (at a 15″ pace) whereas other regiments march at just 120 (with an 18″ stride). Until recently no other regiment has devoted so much time to becoming highly proficient with the rifle, even though it has been part of standard army issue for 140 years; as a consequence, the RGJ’s lowest rank (other than ‘recruit’) is Rifleman (Rfn), rather than Private (Pte), as in other regiments.
The Green Jackets Brigade was an administrative formation of the British Army from 1948 to 1968. The Brigade administered the English rifle regiments. The designation “Green Jackets” was derived from their rifle green tunics indicating their status as rifles.
After the Second World War the British Army had fourteen infantry depots, each bearing a letter. Infantry Depot O at Winchester was the headquarters for the two rifle regiments and the Middlesex Regiment. In 1948, the depots adopted names and this depot became the Green Jackets Brigade. At the same time the Middlesex Regiment was transferred to the Home Counties Brigade, with the remaining regiments each being reduced to a single battalion.
The Brigade combined the depots of:
The Kings Royal Rifle Corps
The Rifle Brigade (prince Consorts Own)
under the Defence Review announced in July, 1957, the infantry of the line was reorganised, and on April 1, 1958, the Oxfordshire and Buckinghamshire Light infantry was transferred from the Light Infantry Brigade, and was renamed as the 1st Green Jackets.The remaining two regiments were also renamed as the 2nd and 3rd Green Jackets on November 7th, so that the Brigade contained three battalions:
1 Green Jackets (43rd & 52nd)
2 Green Jackets, The King’s Royal Rifle Corps
3 Green Jackets, The Rifle Brigade
On January 1st, 1966, the three regiments were amalgamated into a single three battalion “large regiment” called The Royal Green Jackets. In 1968, the Green Jackets Brigade was merged with the Light Infantry Brigade to form the Light Division.
TheRoyal Green Jackets (RGJ) was an infantry regiment of the British Army, one of two Large Regiments within the Light Division (the other being The Light Infantry. It was formed in 1966 by the amalgamation of the three separate regiments of the Green Jacket Brigade:
1 Green Jackets, (43rd and 52nd)
2 Green Jackets, (The King`s Royal Rifle Corps)
3 Green Jackets, (Rifle Brigade)
There were also two Territorial Army battalions made up as follows
4th(V) Bn Royal Green Jackets – formed from the remnants of the Rangers (KRRC), London Rifle Brigade, Tower Hamlets Rifles, Queens Westminster’s, Queen Victoria’s Rifles and Civil Service Rifles.
5th(V) Bn Royal Green Jackets – formed from the 4th Bn the Oxfordshire & Buckinghamshire Light Infantry (TA) and the Buckinghamshire Battalion of the Ox & Bucks Light Infantry
In 1992 1st RGJ was disbanded, 2nd RGJ was renumbered 1st RGJ, 3rd RGJ was renumbered 2nd RGJ.
The last ever Royal Green Jackets unit was the London Oratory CCF who were re-badged as Irish guards in 2010.
Their motto was Celer et Audax latin for, “Swift and Bold”). As they were used as shock troops and marksmen, they had to get to the front line of battle as fast as was possible; as a result the RGJ marches at 140 paces per minute (at a 15″ pace) whereas other regiments march at just 120 (with an 18″ stride). Until recently no other regiment has devoted so much time to becoming highly proficient with the rifle, even though it has been part of standard army issue for 140 years; as a consequence, the RGJ’s lowest rank (other than ‘recruit’) is Rifleman (Rfn), rather than Private (Pte), as in other regiments.
The regiment was classed as a ‘rifle’ regiment, having its lineage in the regiments of foot that were equipped with the first Baker Rifle. Traditionally, rifle regiments wore rifle green tunics, an early form of camouflage, instead of the red jackets worn by line infantry, hence the regimental name. Also, the regiment carried no colours, as traditionally rifle regiments, being skirmishers and sharpshooters, had no need to identify where their fellows were on the battlefield. So, the battle honours of the Royal Green Jackets were worn on the regiment’s cap badge. Infantry in the regiment wore a beret with the badge behind the left eye towards the side of the head, traditionally to show that they do not need to hide behind their colours to show how good the regiment is.Green Jackets were issued with short swords instead of bayonets as the Baker Rifles of the past were shorter than the traditional musket, fitting the sword to the rifle made the overall weapon length the same as a musket with bayonet attached. The RGJ still refer to their bayonets as ‘swords’.
The Royal Green Jackets and its antecedent regiments have been awarded more Victoria Crosses than any other unit, with a total of 59.
Amalgamations of 2007
As part of the 2004 restructuring the infantry, the RGJ was scheduled to be largely unaffected – though the regiment had already been reduced to two Regular battalions in 1992. The regiment would have received a new Territorial Army battalion through the grouping together of the various RGJ companies of the Royal Rifle Volunteers and the London Regiment.
However, on 24 November 2005 it was announced that after discussions between The Light Infantry and the RGJ, the two would be merged together with the Devonshire and Dorset Light Infantry and Royal Gloucestershire,Berkshire and Wiltshire Light Infantry (RGBW) by the end of 2007 to form a single large regiment to be called The Rifles. The new regiment was to contain five Regular Battalions and two TA Battalions.
The reorganisation into “The Rifles” took effect on 1 February 2007:
The 1st Battalion Royal Green Jackets became 2nd Battalion, The Rifles
The 2nd Battalion Royal Green Jackets became 4th Battalion, The Rifles
The surviving Territorial Army companies of 4 & 5 RGJ, along with a company of the RGBW became 7th Battalion, The Rifles
The Maltese Cross cap badge of the RGJ was adopted as the belt badge of The Rifles and will carry the battle honours. The Rifles is a Rifle Regiment and as such will not carry colours. The title “rifleman” was adopted for soldiers of the rank of private, as it had been with the Royal Green Jackets.
The Royal Green Jackets had four Combined Cadet Force units, which are part of the London Oratory School CCF, Winchester Collage CCF, Rutland School CCF and Royal Grammar School High Wycombe CCF (which was originally attached to the Buckinghamshire Battalion).
Battle Honours
A memorial sign of 1982 Regents Park bombing
Louisburg, Quebec 1759, Martinique 1762, Havannah, North America 1763-64, Mysore, Hindoostan, Martinique 1794, Copenhagen, Montevideo, RoLica, Vimiero, Corunna, Martinique 1809, Talavera, Busaco, Barrosa, Fuentes d’Onor, Albuhera, Ciudad Rodrigo, Badajoz, Salamanca, Vitoria, Pyrenees, Nivelle, Nive, Orthez, Toulouse, Peninsula, Waterloo, South Africa 1846-47, Mooltan, Goojerat, Punjab, South Africa 1851-53, Alma, lnkerman, Sevastopol, Delhi 1857, Lucknow, Taku Forts, Peking 1860, New Zealand, Ashantee 1873-74, Au Masjid, South Africa 1879, Ahmad Khel, Kandahar 1880, Afganistan 1878-80, Tel-el-Kebir, Egypt 1882-84, Burma 1885-87, Chitral, Khartoum, Defence of Ladysmith, Relief of Kimberley, Paardeberg, Relief of Ladysmith, South Africa 1899-1902.
The Great War: Mons, Le Cateau, Retreat from Mons, Marne 1914, Aisne 1914, 18, Armentieres 1914, Ypres 1914, 15, 17, 18, Langemarck 1914, 17, Gheluvelt, Nonne Boschen, Givenchy 1914, Neuve Chapelle, Gravenstafel, St. Julien, Frezenberg, Heliewaarde, Aubers, Festubert 1915, Hooge 1915, Loos, Mount Sorrel, Somme 1916, 18, Albert 1916, 18, Bazentin, Delville Wood, Pozières, Guillemont, Flers-Courcelette, Morval, Le Transloy, Ancre Heights, Ancre 1916, 18, Bapaume 1917, 18,Arras 1917, 18, Vimy 1917, Scarpe 1917, 18, Arleux, Messines 1917, 18, Pilckem, Menin Road, Polygon Wood, Broodseinde, Poelcappelle, Passchendaele, Cambrai 1917, 18, St. Quentin, Rosières, Avre, Villers-Bretonneux, Lys, Hazebrouck, Bailleul, Kemmel, Bethune, Drocourt Quéant, Hindenburg Line, Havrincourt, Epehy, Canal du Nord, St. Quentin Canal, Beaurevoir, Kortrijk, Selle, Valenciennes, Sambre, France and Flanders1914-18, Piave, Vittorio Veneto, Italy 1917-18, Doiran 1917- 18, Macedonia 1915-18, Kut al Amara 1915, Ctesiphon, Defence of Kut Amara, Tigris 1916, Khan Baghdadi, Mesopotimia 1914-18. Archangle 1919
The Second World War:Defence of Escaut, Calaise 1940, Cassel, Ypres-Comines Canal, Normandy Landing, Pegasus Bridge, Villers Bocage, Oden, Caen, Esquay, Bourguebus Ridge, Mont Pincon, Le Perier Ridge, Falaise, Antwerp, Hechtel, Nederrijn, Lower Maas, Roer, Ourthe, Rhineland, Reichswald, Kleve, Goch, Hochwald, Rhine, Ibbenbueren, Dreirwalde, Leese, Aller, North- West Europe1940, 44-45, Egyptian Frontier 1940, Sidi Barrani, Beda Fomm, Mersa el Brega, Agedabia, Derna Aerodrome, Tabruk 1941, Sidi Rezegh 1941, Chor es Sufan, Saunnu, Gazala, Bir Hacheim, Knightsbridge, Defence of Alamein Line, Ruweisat, Fuka Airfield, Alam el Halfa, El Alamein, Capture of Haifaya Pass, Nofilia, Tebaga Gap, Enfidaville, Medjez el Bab, Kasserine, Thala, Fondouk, Fondouk Pass, El Kourzia, Djebel Kournine, Agroub el Megas, Tunis, Hamman Lif, North Africa 1940-43, Sangro, Salerno, Santa Lucia, Salerno Hills, Cardito, Teano, Monte Camino, Garigliano Crossing, Damiano, Anzio, Cassino II, Liri Valley, Melfa Crossing, Monte Rotondo, Capture of Perugia, Monte Malbe, Arezzo, Advance to Florence, Gothic Line, Coriano, Gemmano Ridge, Lamone Crossing, Orsara, Tossignano, Argenta Gap, Fossa Cembalina, Italy 1943-45, Veve, Greece 1941, 44,45, Crete, Middle East 1941, Arakan Beaches, Tamanda, Burma1943-44.
Uniform
All Green jackets would have historically been made of wool with a lining of linen to give shape to the garment. The modern scarlet wool is also supplied by “Abimelech Hainsworth” and is much lighter than the traditional material, which was intended for hard wear on active service. Their boots were made of fake thick animal hide, this was then lined in a thin layer of wool. They had a small pouch on the side of their hip, this contained the ammunition for their rifles.
Tour of shame
Three member`s of the 1st Battalion The Royal Green Jackets, brought total shame on the Regiment during a posting in Cyprus 1993 to 1996.
On the 16th September 1994 the three members were involved in a incident that shocked the World.
WWI post card picture c 1919-1921 RB and KRRC veterans of the Crimea, Zulu War
1802–1816 as 95th Rifle Regiment
1816–1966 as Rifle Brigade
The Rifle Brigade (Prince Consort’s Own) was an infantry regiment of the British Army, formed in 1800 to provide sharpshooters, scouts and skirmishers.
The brigade was distinguished by its use of green uniforms as standard in place of the traditional red—the first regular infantry corps in the British Army to do so.
Formation
In 1800, an “Experimental Corps of Riflemen,” was raised by Colonel Coote Mannningham and Lieutenant-Colonel the Hon. William Stewart, drawn from officers and other ranks from drafts of a variety of British regiments. The Corps differed in several regards from the Line infantry of the British Army. Most significantly, the Rifles were armed with the formidable Baker rifle, which was more accurate and of longer range than the musket, although it took longer to load. As the rifle was shorter than the musket, it was issued with a 21-inch sword bayonet.
Riflemen wore dark green jackets rather than the bright red coats of the British line infantry regiments of that time; close-fitting pantaloons, rather than breeches; black facings and black belts rather than white; a green plume on their “stovepipe shakoes” which the Light Infantry also wore, as well as other accoutrements unique to Rifles regiments.
95th Rifles reenactors firing whilst kneeling and in the Plunkett position
Training and Tactics
The riflemen were trained to work in open order and to be able to think for themselves. They were to operate in pairs ahead of the main infantry, which were bunched in close formations. They were taught to make best use of natural cover and to harass the enemy with aimed shots. These tactics, which had originated in campaigns in North America, were unorthodox for the time. It was considered too impractical for individual soldiers to aim at specific targets (see “Battle tactics of Napoleon and his enemies” by Nosworthy) and conventional tactics favoured the mass volley from a close formation and the bayonet.
The treatment of soldiers in the new Rifle Corps was markedly different from the line infantry. Although Flogging existed as a means of enforcing military discipline, it was seldom used. The unit held regular shooting and sporting competitions, and men were rewarded for their achievements. Officers would regularly dine with their men and so became familiar with each man in their respective companies, an unusual practice at the time.
the black and the green,
the finest colours ever seen.
A play on the word colours.
To aid speed and mobility, the Rifles used bugles to transmit commands rather than the drums used by Line infantry and for the same reason did not carry Colours.
The Baker Rifle
The new regiment was armed with the Baker rifle which, though it took two or three times as long to load. and required a separate calibre of ball (leading to supply issues), was considerably more accurate and effective at a longer range than the standard issue Brown Bess musket of the line regiments and regular light infantry companies.
This rifle was an accurate weapon for its day, with reported kills being taken at 100–300 yards (270 m) away. During the Peninsula War, Rifleman Thomas Plunkett of the 1st Battalion, 95th Rifles, shot the French General Auguste-Marie-francois Colbert at a range that may have been even greater. He then shot a second French officer who rode to the general’s aid, proving that this was not just a lucky shot. By comparison, a standard issue Brown Bess musket was unlikely to hit a man-sized target at ranges beyond 80 yards.
Military operations
Four months after its formation the Rifle Corps was judged ready for its first operation. On 25 August 1800, three companies, under the command of Lieutenant-Colonel William Stewart, spearheaded a British amphibious landing at Ferrol, Spain, where the Rifles helped to dislodge the Spanish defenders on the heights. Despite the Rifles acting in a valiant manner the expedition was defeated and withdrew on 26 August. In 1801, detachments of the Rifle Corps took part in the British victory at the Battle of Copenhagen, as marksmen aboard Royal Navy ships which were under the command of the legendary Vice-Admiral Horatio Nelson.
The 95th Regiment
In 1802 the Rifle Corps was brought into the line of the British Army as the 95th Regiment of Foot, the 95th Rifles. In 1803 the 95th moved to Shorncliffe, Kent, where it underwent training, along with the light infantry regiment the 43rd and 52nd Regiments of Foot, under the tutelage of Colonel Coote-Manningham and Sir John Moore, the latter, like the 95th, would gain fame during the Peninsula War.
2nd Battalion
In 1805 a 2nd Battalion was raised at Canterbury, Kent, and later in the year the 1st/95th deployed to Germany as part of a British expedition, under the command of Lord Cathcart, designed to liberate Hanover from occupation by France, with the 95th subsequently forming the advance guard on the way to Bremen. In February 1806 the 95th formed the rearguard for the withdrawal to Cuxhaven and subsequently returned home to the UK. In October, five companies of the 1st/95th and three companies of the 2nd/95th departed for Spanish-controlled South America, Spain then being allied with France. It was part of a second invasion force that was designed as reinforcements for the first invasion against Buenos Aires, launched earlier in 1806 by Sir Home Popham without the Government’s knowledge. The first invasion had already failed, although Brigadier-General Sir Samuel Auchmuty, commander of the second invasion force, was unaware of this failure.
The 2nd/95th, as part of Auchmuty’s force, took part in the siege and subsequent storming of Montevideo, in what is now Uruguay, and which eventually saw Montevideo captured on the 3 February 1807, after a siege that had begun in January. The 95th subsequently saw action at Colonia against a Spanish force that had crossed from Buenos Aires where the Rifles held off the force until it could be repulsed, with the 95th gaining much praise from Auchmuty for their part in the defeat of the Spanish force. The 95th subsequently saw action in June at San Pedro where they, the 40th and light companies, fought against the Spanish force that had crossed from Buenos Aires and defeated them. Lieutenant-General John Whitelocke, the newly-arrived overall commander, subsequently launched an ill-advised and mis-managed assault on Buenos Aires in which the companies of both battalions of the 95th were involved as part of the Light Brigade, commanded by Robert Craufurd. During the assault on Buenos Aires on 5 July, the 95th and the rest of the British force suffered heavy casualties in bitter fighting to capture the city. The Light Brigade had suffered so heavily that they had to take refuge in a church and surrendered soon after. Whitelocke eventually surrendered his force. After Whitelocke negotiated the withdrawal of British forces, the men were released and they returned home later that year. In the aftermath of the disastrous expedition, Popham and Whitelocke were court-martialled, with Popham reprimanded and Whitelocke dismissed from the Army. (The Light Brigade of the Crimean War made famous in Tennyson’s poem, was an unrelated cavalry unit.)
The Baltic 1807 to 1808
Copenhagen on fire, 1807
The remaining companies of the 95th were involved in the expedition to Denmark that year. They took part in the Battle of Copenhagen in 1807 as part of Arthur Wellesley’s brigade. The expedition, commanded by Lord Cathcart, was intended to capture the Danish Fleet to prevent it falling into the hands of France. The expedition proved to be a thorough success with the Danish Fleet being captured at which point the British withdrew. In 1808 the 1st/95th took part in an expedition to another Scandinavian country, Sweden, an expedition that was commanded by Sir John Moore and designed to help Sweden during their war with Russia. However, once they had reached Gothenburg in May, the troops remained aboard the anchored ships for two months due to a misunderstanding between the British and Swedish governments and returned to Britain before being redirected to Portugal to take part in the Peninsular War, a war designed to help Portugal and Spain in their fight against the French, and where the 95th Rifles would gain their fame.
Peninsular War
See also: British Army during the Napoleonic Wars
In August the 2nd/95th was part of the expedition commanded by Sir Arthur Wellesley to Portugal and covered the landings at Mondego Bay. On 15 August they had the distinction of firing the first shots of the Peninsular War during a skirmish at Óbidos against the French, but also unfortunately suffered the first British officer fatality of the war, a Lieutenant Ralph Bunbury. On 17 August the 95th, as part of 6th Brigade which included the 5th/60th Foot, took part in the Battle of Roliça, the first pitched battle of the war, which saw the 95th distinguish themselves greatly.
The 1st/95th was force marched in an attempt to arrive with the main force for the Battle of Talavera but despite covering a notable distance they arrived on the 29 July 1809, after the battle.
An example of the ability of the Rifles was at the Battle of Nivelle in 1813 (see also the Battle of San Marcial) when a company of the 95th Rifles under the command of Captain Daniel Cadoux held off an entire French division inflicting 231 casualties and suffering 14 killed, including Cadoux.
Prince Albert
The 95th, having seen distinguished service in the Napoleonic Wars, became the “Rifle Brigade” on 23rd February 1816. Following this, the number was reassigned in 1823 to the newly formed county regiment of the 95th (Derbyshire) Regiment of Foot. The Duke of Wellington served as Colonel-in-Chief of the regiment from 1820 until his death in 1852. It was granted the title “The Prince Consort’s Own Rifle Brigade” in honour of HRH Prince Albert, The Prince Consort, the Rifle Brigade’s former Colonel-in-Chief.
Crimean War
When the Crimean War broke out in 1853 the Rifle Brigade sent two battalions which fought at the Alma, where one of the battalions led the advance across the Alma River, Inkerman and at the Siege of Sevastopol. The regiment won eight Victoria Crosses during the Crimean War, more than any other regiment.
Timothy O’Hea’s Victoria Cross
In 1866, Private Timothy O’Hea of the 1st Battalion, was awarded the Victoria Cross for an act of bravery in peacetime, while his unit was stationed in Canada.
On 9 June 1866, at Danville, Quebec, on the main railway between Montreal and Quebec City, a fire broke out in an car containing 2,000 lb (900 kg) of ammunition. O’Hea took charge of extinguishing the fire.
This Photograph was actually taken in India on the North West Frontier at Christ Church in Shimla. Shimla was where the British Army HQ relocated to in summer to get away from the stifling heat in Delhi.
The Church is the second oldest Christian church in India and was completed in 1857. It is mustard coloured and is still used.
I am not sure of the date of the photo exactly, but some of the soldiers are wearing South Africa medals so it must post date 1902. From the legend on the drum, the soldiers are identifiable as the Prince Consort’s Own Rifle Brigade.
This postcard from 1906 that shows a Rifle Regiment doing a ceremonial changing of the guard at The Grand Shaft. They were not part of the Dover garrison, but did come down for a fortnight’s training as did many others.
The 4 Photographs above and small write up by Phil Eyden
First World War
The Rifle Brigade fielded 28 battalions during the First World War, from its original complement of 4 regular and 2 reserve, seeing service primarily on the Western Front, but also in Macedonia. The regiment lost 11,575 killed during the course of the war. They were awarded many battle honours, 10 Victoria Crosses and many other decorations.
The 8th Battalion of the Rifle Brigade (together with the 7th & 9th battalions) was part of the 41st Brigade of the 14th (Light) Division of XV Corps. They were mainly made up of volunteers from the outbreak of World War I. The battalion saw action including Ypres salient and the Somme. Notably the action they were in at Hooge, Belgium (30–31 July 1915) saw the first use of flamethrowers by the Germans, Sidney Clayton Woodroffe was awarded the VC for his actions in this battle.
Alfred George Drake, a corporal in the 8th Battalion, was posthumously awarded the VC for his actions on 23 November 1915, near La Brique, Belgium.
They also participated in the Battle of Flers-Courcelette (15 September 1916) during the Somme Offensive which was one of the first uses of the tank in large scale battles by the British.
Second World War
Churchill Crocodile tank, in support of the Rifle Brigade during the attack on Sint Joost, 20–21 January 1945. Many of the houses in the village were destroyed by these flame throwing tanks.
The Rifle Brigade raised seventeen battalions to fight in the Second World War. In 1937, the regiment formed the first motor battalions, a role that would allow the Rifle Brigade freedom of movement which fit their tradition of speed and initiative. The 1st Battalion of the regiment was forced to surrender during the Battle of France in 1940 with the survivors of the 2nd Battalion KRRC and the now embodied Territorial Army battalion of the Queen Victoria’s Rifles (KRRC). After a four day epic battle to hold Calais only 30 men escaped by Royal Navy launch just at the point of surrender, late afternoon 26 May, but not before they had fought a gallant last stand using up the last of their ammunition as they pulled back into the port.
The 1st Battalion was reformed in the UK and took part with the 2nd Battalion in the battles in North Africa. The 1st Battalion’s four 6-pounders were credited with destroying 19 tanks from the 21st Panzer Division at the Battle of Alam el Halfa on the 31 August 1942. The 2nd Battalion Rifle Brigade fought with distinction in the Western Desert Campaign, especially in the “Snipe” action during the Battle of El Alamein, where the four 6-pounders of that battalion, supported by a Royal Artillery 6-pounder Anti-Tank battery, destroyed fifty-one German and Italian tanks in a battle that lasted sixteen hours. Lieutenant Colonel Turner received the Victoria Cross for his actions fighting with the guns.
Four battalions of the regiment fought in the Italian Campaign, the 1st returning to England in December 1943 to prepare for the invasion of North West Europe. The remaining three battalions were formed into 61st Infantry Brigade, but continued their accustomed role of co-operating with armour when conditions allowed. Their capture of the hills of Perugia involved four successive night attacks. The 1st and 8th Battalions landed in Normandy, in June 1944, and fought their way through France, Belgium and the Netherlands to end the war in the vicinity of Hamburg.
Post War
From spring 1946 a number of surplus Rifle Brigade subalterns were transferred to No1 T-Force, a British Army unit which was active in the Ruhr. Their role was to carry out reparations work, evacuating military and industrial equipment needed to rebuild British industry.
Amalgamations
In 1958 the 1st Battalion was the last surviving battalion that traced its lineage back to the 95th. It was renamed the 3rd Green Jackets Regiment of the Green Jackets Brigade. When the brigade was amalgamated into the Royal Green Jackets in 1966, it became its 3rd Battalion. In 1970 it was reduced to company strength before being reconstituted at Shoeburyness in 1972. In 1992 the 1st battalion was disbanded and the 2nd and 3rd battalions were renumbered as the 1st and 2nd respectively. On 1 February 2007 the 2nd battalion were ceremonially rebadged at Kiwi Barracks in Bulford to become the 4th Battalion of the newly formed regiment – The RIFLES.
Also see
Peninsula Barracks in Winchester, the home of the Rifle Brigade
ArticlesComments Off on The King`s Royal Rifle Corps
Sep202011
The King`s Royal Rifle Corps
WWI post card picture c 1919-1921 RB and KRRC veterans of the Crimea, Zulu War
The King’s Royal Rifle Corps , was raised in the American colonies in 1756 as the 62nd (Royal American) Regiment to defend the thirteen colonies against attack by the French and their native American allies. After Braddock’s defeat in 1755, royal approval for a new regiment, as well as funds, were granted by Parliament just before Christmas 1755 – hence the regiment’s traditional birthday of Christmas Day. However parliamentary delays meant it was 4th March in 1756 before a special act of parliament created four Battalions of 1,000 men each to include foreigners for service in the Americas.
Benjamin West’s depiction of William Johnson sparing Baron Dieskau’s life after the Battle of Lake George. (Reportedly uniforms of soldiers in background right are of the “Royal Americans”).
According to a regimental history compiled in 1879 by a captain in the Kings Royal Rifle Corps, in the November of 1755 Parliament voted the sum of 81,000 Pounds for the purpose of raising a regiment of four battalions, each one thousand strong for service in British North America. Parliament approved “An Act to enable His Majesty (George II) to grant commissions to a certain number of foreign Protestants, who have served abroad as officers or engineers, to act and rank as officers or engineers in America only, under certain restrictions and regulations.” The Earl of Loudon, who as Commander-in-Chief of the forces in North America, was appointed Colonal-in-Chief of the regiment. About fifty officers’ commissions were given to Germans and Swiss, and none were allowed to rise above the rank of lieutenant-colonel.
According to a modern history of the regiment, the idea for creating this unique force was proposed by Jacques Prevost, a Swiss soldier and adventurer who was a friend of the Duke of Cumberland (William Augustus, who was the King’s second son and was Commander-in Chief of the British Army.) Prevost recognised the need for soldiers who understood forest warfare, unlike the regulars who were brought to America in 1755 by General Braddock.
The regiment was intended to combine the characteristics of a colonial corps with those of a foreign legion. Swiss and German forest fighting experts, American colonists and British volunteers from other British regiments were recruited. These men were Protestants, an important consideration for fighting against the predominantly Catholic French. The officers were also recruited from Europe – not from the American colonies – and consisted of English, Scots, Irish, Dutch, Swiss and Germans. It was the first time foreign officers were commissioned at British Army officers. The total regiment consisted of 4,160 enlisted men, 101 officers and 240 non-commissioned officers. The battalions were raised on Governor’s Island, New York. The regiment was renumbered the 60th (Royal American) Regiment in February 1757 when the 50th (Shirley’s) and 51st (Pepperel’s) foot regiments were removed from the British Army roll after their surrender at Fort Oswego.
Among the distinguished foreign officers given commissions in the 60th (Royal Americans) was Henri Bouquet, a Swiss citizen, whose ideas on tactics, training and man-management (including the unofficial introduction of the rifle and ‘battle-dress`) would become universal in the British Army some 150 years later. Bouquet was commanding officer of the 1st battalion, and with his fellow battalion commanders, set about creating units that was better suited to warfare in the forests and lakes of northeast America. The Royal Americans represented an attempt to produce a more able soldier who was encouraged to use his initiative while retaining the discipline that was noticeably lacking in the irregular units of colonial Rangers that were being raised at the same time.
The new regiment fought at Louisbourg in 1758 and Quebec in 1759 in the campaign which finally wrested Canada from France; at Quebec it won from General James Wolfe the motto Celer et Audax (Swift and Bold). These were conventional battles on the European model, but fighting during Pontiac’s Rebellion in 1763 was of a very different character. The frontier war threatened the British control of North America. The new regiment at first lost several outlying garrisons but finally proved its mastery of forest warfare under Bouquet’s leadership at the victory of Bushy Run.
The 60th were uniformed and equipped in a similar manner to other British regiments with red coats and cocked hats or grenadier caps, but on campaign, swords were replaced with hatchets, and coats and hats cut down for ease of movement in the woods.
Napoleonic Wars
During the Napoleonic Wars the regiment saw action in the Peninsula War. The first four battalions had been raised as regular line battalions, but in 1797 a 5th battalion had been raised and equipped entirely with the Baker rifles, and wore green jackets with red facings. The mixing of rifle troops and muskets proved so effective that eventually the line battalion light companies were replaced with rifle companies. The line battalions found themselves in several different theatres, including the West indies. The rifle battalion was soon joined by a second, and these found themselves in the Peninsula with Wellington’s army, serving along with the 95th Rifles, and the Kings German Legion rifle units. A 7th battalion was eventually raised as a rifle battalion specifically for service in the American War of 1812
After the Napoleonic Wars the regiment received a new title: first, in 1815, its name was changed to The Duke of York’s Own Rifle Corps and then, in 1830, to the King’s Royal Rifle Corps (KRRC). In 1858 the Rifle Depot at Winchester was made their headquarters. During the rest of the 1800s the unit was active in China, Canada (Wolsley Expedition), Afghanistan, India, Burma and South Africa. The regiment was deployed during the Second Boer War from the outset playing a key role in the first battle at Talana Hill.
World War I
In World War I the KRRC was expanded to twenty-two battalion’s and saw much action on the Western Front, Macedonia and Italy. Over 12,000 soldiers of the regiment were killed while eight members won the Victoria Cross and over 2,000 further decorations were awarded. After 1918 the unit returned to garrison duties in India, Palestine and Ireland. In 1922 the regiment was reduced from four to two battalions with the third and fourth being disbanded. In 1926 the regiment was reorganised as one of the first mechanised infantry regiments.
World War II
In World War II after initial deployment to France as part of the BEF, the regiment lost two battalions at the Defence of Calais (2nd Bn KRRC and 1st Bn the Queen Victoria’s Rifles (TA) where a Green Jacket Brigade held up the German advance to enable the evacuation of the allied armies at Dunkirk. Redeployed to northern Africa the unit began to see success, continuing with actions in Italy, Austria, Germany and in the Battle of Greece and Crete (where its 9th Battalion, The Rangers (TA) , served with 1st Armoured Brigade Group). The 1st Battalion served in the 4th Armoured Brigade that failed to link up with the 1st Parachute Division at the Battle of Arnhem. Post war the unit was deployed in Germany.
Royal Green Jackets
In 1948, for administrative purposes the KRRC was brigaded with Ox and Bucks Light Infantry and the Rifle Brigade to form the Green Jackets Brigade.
In 1958 the Regiment was re-titled as the 2nd Green Jackets, The King’s Royal Rifle Corps, as were the two other regiments of the Green Jackets Brigade, re-titled 1st and 3rd Green Jackets respectively.
In 1966 the three regiments were amalgamated to form the three battalions of the Royal Green Jackts Regiment (RGJ).
In 1992 the 1st Battalion, Royal Green Jackets was disbanded, and the KRRC were renumbered as the 1st Battalion, with the 3rd Battalion (former Rifle Brigade) becoming the 2nd Battalion.
In 2007, the two-battalion RGJ regiment was amalgamated with the remaining Light Infantry regiments, to form the five Regular and two Territorial battalions of The Rifles.
The regiment’s traditions are preserved by the 2nd Battalion, The Rifles, which is a re-designation of the 1st Battalion, Royal Green Jackets
Territorial Battalions
Queen Victoria’s Rifles
The Rangers
The Queen’s Westminsters
In World War II these territorial battalions were made formally part of the KRRC as follows:
1st Battalion The Queen’s Westminsters – 11th Battalion KRRC
2nd Battalion The Queen’s Westminsters – 12th Battalion KRRC
Cadet Battalions
1st Cadet Battalion, The King’s Royal Rifle Corps
Queen Victoria’s Rifles Cadet Corps (re-titled the 2nd Cadet Battalion, The King’s Royal Rifle Corps in 1945)
Over the years the formation of the cadet battalions was changed regularly, due to the changes to do with rules and commanding officer.
The 1st Cadet Battalion owes its foundation to the Reverend Freeman Wills, who was commissioned into the Volunteer Army in the rank of Captain on the 26th of July 1890.
He was also Vicar of St Agatha’s just behind Sun Street, Finsbury Square. On receiving his commission he decided to form a cadet company within the 1st Cadet Battalion, The Royal West Surrey Regiment. The Company quickly expanded to become the 2nd Cadet Battalion, The Royal West Surrey Regiment, at which point he moved the Battalion Headquarters to No. 2 Finsbury Square (and in 1904 to 42 Sun Street, which he had specially built for the purpose).
In 1894 he applied to HRH Prince George, Duke of Cambridge, Colonel-in-Chief, to affiliate to the Regiment, with the title of 1st Cadet Battalion, The King’s Royal Rifle Corps. Consent was granted on the 8th of November 1894 and the Battalion has remained a part of the Regiment ever since.
In the days of its foundation Cadet battalions were privately organized and funded. On becoming a part of The King’s Royal Rifle Corps subscriptions began to flow in and after the commanding officer had spent nearly £1,000, the Battalion was placed on a financial basis, which many Volunteer Corps would have envied. There were to be many ups and down in later years, especially when recognition of the Cadet Force was withdrawn between the two World Wars, but fortunately the enthusiasm and commitment of those involved consistently triumphed over the parsimony of Governments.
In 1900, when volunteers were urgently needed for the South African War, The Commanding Officer, Colonel Freeman Croft-Wills persuaded the War Office to accept a Company of the older Cadets, principally N.C.O.s (Non-Commissioned Officers), the company being enrolled in the City Imperial Volunteers. Around 100 cadets thus served in South Africa with this unit, whilst other Cadets and ex-Cadets served in the R.A.M.C. (Royal Army Medical Corps), and other units. Four were killed in action, one serving with the 1st KRRC at the battle of Dundee, and the others with units of the C.I.V.s. Their comrades erected brass plaques in their memory in the Drill Hall at Sun Street. These are now displayed in the Cadet Company Office here at Davies Street.
In recognition of this service, King Edward VII granted the Battalion the honour of wearing on its accoutrements the Battle Honour “South Africa 1900-1902” (Army Order 151 of 1905). The announcement of this privilege was made to the Battalion by His late Majesty, King George V, then Prince of Wales, when, accompanied by Her Majesty Queen Mary, he distributed the prizes at the Guild Hall in the City of London. The 1st Cadet Battalion KRRC are the only Cadet Unit in the United Kingdom to have been granted such an honour and are permitted to wear the miniature 60th Cap Badge with the single Battle Honour, and call their Cadets “Riflemen”.
The 2nd Cadet Battalion, The King’s Royal Rifle Corps was formed in 1942 when a Home Guard instruction was issued ordering each Home Guard battalion to raise a cadet unit. Lieutenant-Colonel R.L. Clark of Queen Victoria’s Rifles was given the task and on the 15th of May the Queen Victoria’s Rifles Cadet Corps was born. Over the next three years the unit expanded to five companies, which in April 1945 led to it being re-titled the 2nd Cadet Battalion, The King’s Royal Rifle Corps. In 1951 the 1st and 2nd Cadet Battalion were amalgamated. This resulted in the disposal of the Headquarters of the 1st Cadet Battalion at 42 Sun Street. In 1954 the Battalion office of the ‘new’ 1st Cadet Battalion was established at 56 Davies Street, where it remains to this day.
Today the KRRC 1st Cadet Battalion still exists,with the following units making up the Battalion:
A Company, 231 KRRC (Paddington) Rifles ACF
B Company, 232 KRRC (Westminster) Rifles ACF
C Company, 233 KRRC (Camden) Rifles ACF
D Company, 234 KRRC (Putney) RGJ ACF; until recently when they formed the London Oratory School RGJ ACF unit (now CCF), although they were rebadged as Irish Guards in 2010 (making them the last remaining RGJ unit).
Alliances
Canada – The Queen’s Own Rifles of Canada (1956–1966)
ArticlesComments Off on Oxfordshire and Buckinghamshire Light Infantry (43rd and 52nd)
Sep202011
O.B.L.I
The Oxfordshire and Buckinghamshire Light Infantry was an infantry regiment of the British Army.
The regiment was formed as a consequence of Childers reforms, a continuation of the Cardwell reforms, by the amalgamation of the 43rd (Monmouthshire) Regiment of Foot (Light Infantry) and the 52nd (Oxfordshire) Regiment of Foot (Light Infantry), forming the 1st and 2nd Battalions, The Oxfordshire Light Infantry on 1st of July 1881.
In 1908 the regiment’s title was altered to become the Oxfordshire and Buckinghamshire Light Infantry, commonly shortened to the ‘Ox and Bucks’.
Operations across the Empire ( 1881-1914 )
1st Battalion
The 43rd Foot was based in Burma when it became the 1st Battalion. In 1882 it moved to Bangalore, India. In 1887 the battalion returned home, being based in Parkhurst, England. It moved to Kinsale, Ireland in 1893 and, having been based in other parts of Ireland, returned to England in 1898. In December 1899 the Second Boer War began and the 1st Battalion arrived in Southern Africa to take part in it. It saw extensive service in the conflict, including in the relief of the besieged British garrison at Kimberley and in the defeat of the Boers at Paardeberg in February. The war raged on for a further two years and the regiment saw extensive service for the duration of the conflict. The Oxfordshires returned to the UK in 1902 with the conclusion of the war. It moved to India the following year where it was based until the outbreak of war in 1914
2nd Battalion
Transport moving across the Caen Canal Bridge at Benouville, June 1944. The bridge was renamed Pegasus Bridge after the mythical winged horse on the formation sign of British airborne force
Below are stories of some of the brave individuals who were involved in the Pegasus Bridge landings or Operation Deadstick
Major Howard DSO, aged 31:
Company Commander.
After 6 six of service in the ranks of the KSLI and a spell with the Oxford City Police, he re-enlisted in 1939 and was commissioned into the Ox & Bucks LI (52nd) in 1940.
Quickly promoted to Major.
Landed at Pegasus Bridge within 15 yards of the bridge defences.
Wounded twice during fighting in Normandy.
Badly injured in 1944 in a vehicle accident and was invalided out of the army.
Passed away in 1999.
The actor Richard Todd played Maj John Howard in the film The Longest Day made in 1962.
Lieutenant Brotheridge, aged 29
Platoon Commander, No 25 Platoon.
Outstanding footballer (Amateur player for Aston Villa).
Joined the Army in 1939 and was posted to 2 Ox & Bucks (52nd) in 1942.
Killed leading his platoon over Pegasus Bridge (first allied officer to be killed on D-Day).
Recommended for posthumous MC, awarded Mention in Despatches.
Brotheridge was the inspiration behind the sculpture commissioned by the D-Day Story Museum and created by Welsh artist Alfie Bradley to mark the 75th anniversary year of D-Day and as a tribute to those who lost their lives.
Lieutenant (later Major) Smith, MC, aged 22
Outstanding cricketer.
Commissioned in 1942 and posted to 2 Ox & Bucks LI (52nd).
Wounded during the assault on Pegasus Bridge and evacuated to the UK.
Awarded the MC.
Re-joined the 52nd and took part in an air assault on the Rhine Crossings in 1945.
Promoted to Major.
Passed away in 1993.
Lieutenant (later Colonel) Wood, MBE, aged 20
Commissioned in 1942 and posted to 2 Ox & Bucks LI (52nd).
Severely wounded during the assault on Pegasus Bridge and evacuated to the UK.
Pursued an active military career until retirement as Colonel in 1978.
Awarded MBE in 1961 and French Legion of Honour in 2004.
Passed away in 2009.
Lieutenant (later Colonel) Sweeney, MC, aged 25
Commissioned in 1941 and posted to 2 Ox & Bucks LI (52nd).
Took part in the capture of the bridge over the River Orne.
Awarded the MC for gallantry the following day.
Engaged in air assault on Rhine Crossings in 1945.
Served operations in Palestine, Cyprus, Brunei and Borneo.
Twice mentioned in despatches.
Retired in 1974 to run Battersea Dogs Home.
Passed away in 2001.
Sourced from and credited to RGJ Museum Facebook. (unknown author)
D Day
The 52nd Light Infantry was based in Oxford, England when it became the 2nd Battalion. This was the 52nd of Waterloo fame who, under the command of Colonel Sir John Colborne, broke a battalion of the Chasseurs of the Imperial Guard. In 1884 it arrived in Gibraltar and the following year took part in the expedition to Egypt. In 1886 they were based in India, where they would remain into the 20th century. During their stay they took part in the Tirah Expedition in the volatile North-West Frontier in 1897. In 1903 the battalion returned home, being based in Chatham. They were still based in Britain when World War I was declared.
First World War ( 1914-18 )
During the war, the Ox & Bucks raised 12 battalions (17 in all), six of which fought on the Western Front, two in Italy, two in Macedonia and one in Mesopotamia. The regiment won 59 battle honours and four theatre honours. Many gallantry honours were awarded to the Ox & Bucks, including two Victoria Crosses—the most prestigious honour for bravery in the face of the enemy—that were awarded to Company Sergeant Major Edward Brooks and Lance-Corporal Alfred Wilcox, both of the 2/4th Battalion.
The Western Front
2nd Ox & Bucks defeating the Prussian Guard at Nonne Bosschen. Painting by William Barnes Wollen (1857–1936)
In 1914 the 2nd Ox and Bucks arrived on the Western Front as part of the 5th Infantry Brigade, 2nd Division – one of the first divisions of the British Expeditionary Force (BEF) to arrive in France. The battalion took part in the first British battle of the war, at Mons, where the British defeated the German forces that they had encountered on 23rd August. The battalion subsequently took part in the retreat that began the following day, not stopping until just on the outskirts of Paris, then halting the German advance at the First Battle of the Marne (5–9 September). The 2nd Ox & Bucks later took part in all the subsidiary battles of the First Battle of Ypres (19 October – 22 November) that saw the heart ripped out of the old Regular Army, with 54,000 casualties being sustained by the British Army. On 11 November the Germans made another attempt to capture Ypres, sending—on the orders of the German Kaiser—the élite Prussian Guard against the British forces. The 2nd Battalion counter-attacked them at Nonne Bosschen wood, proceeding to prevent their advance and rout them. First Ypres was the last major battle of 1914.
At the Battle of Festubert – which was launched in support of the French attack south of Vimy Ridge – in May 1915 the 2nd Ox and Bucks were part of the second wave of the 5th Brigade attack and, during the course of the battle, sustained just under 400 casualties; the largest the regiment had suffered so far in the war, and the largest it had suffered for over 100 years. Battalions of the regiment also saw action at Loos in September, and the 2nd Ox & Bucks alone took part in the subsequent attack against the Hohenzollern Redoubt in October. The 1/4th Ox & Bucks took part in the First Day of the Somme on 1 July 1916, in which the British Army suffered over 60,000 casualties – the largest casualties sustained in a day by the British Army. The battalions of the Ox & Bucks on the Western Front saw extensive service during the Battle of the Somme (1 July – 18 November), suffering heavily, including at Mametz Wood, Pozières, and at Ancre the last major subsidiary battle.
In March 1917 the Germans began the retreat to the Hindenburg Line and the regiment’s battalions saw much involvement in the Arras Offensive that began on 9 April and ended on 16 May, including at the Battles of Scarpe and Arleux. The battalions of the Ox & Bucks saw further service in many of the subsidiary battles during the Battle of Passchendaele (also known as Third Ypres) that took place between 31 July-6 November. Some of the battles that the Ox & Bucks took part in included Menin Road and Polygon Wood in September and early October. The Ox & Bucks also took part in the Battle of Cambrai (20 November-3 December) that saw the first large-scale use of tanks by the British and was the last major battle 1917. On 21 March 1918 the Germans launched the last-gasp Spring Offensive (Operation Michael) and the Ox & Bucks suffered yet more heavy casualties as part of the defence of the Somme during the St. Quentin and in subsequent battles that saw the Germans achieve significant gains. After that offensive lost its momentum, the Germans launched Operation Georgette in April which the Ox & Bucks defended against in the Battle of the Lys and subsequent actions. By August the Germans offensives had failed and the Allies had launched a counter-offensive against the Germans. In August the 2nd Ox & Bucks took part in the Battle of Albert (1918) and the Second Battle of Bapaume while the 2/4th Ox & Bucks and the 2/1st Buckinghamshires took part in the advance into Flanders, with both offensives seeing the Allies advance to the Hindenburg Line by early September. The 2nd Ox & Bucks took part in the offensive against it that saw the Allies break through the defence, taking part in the Battle of Havrincourt, Battle of the Canal du Nord and the Second Battle of Cambrai. The Regiment then took part in the last actions of the war, taking part in the Battle of the Selle and the Battle of Valenciennes. The war ended on 11 November 1918 with the signing of the Armistice between the Allies and Germany. 15,878 members of the regiment lost their lives during the First World War.
Mesopotamia
The 1st Ox & Bucks, as part of the 17th (Ahmednagar) Brigade, 6th (Poona) Division, left India for Mesopotamia (now Iraq); there, the Battalion took part in the campaign against the Ottoman forces that ruled the country.
The Battalion took part in the march towards Kut-al-Amara with the intention of capturing it from the Ottomans. The battle for Kut began on 26 September and raged for a number of days until the Ottomans went into retreat and Kut was captured on 28 September. The Battalion then took part in the Battle of Ctesiphon (22–24 November) during the pursuit of the Ottoman forces and in the effort to capture the capital Baghdad, which ended in the 6th Poona Division being defeated by the Ottomans. The Division subsequently retreated to Kut, reaching it on 3 December, where they were besieged by the Ottomans, beginning on 7 December, with a garrison of 10,000 British and Indians. The Ottomans launched numerous attempts to take Kut, all of which were repulsed by the defenders, with both sides suffering heavy casualties. The British launched numerous attempts to relieve Kut, all of which failed with heavy losses. On 26 April 1916—supplies had dwindled significantly and many of the garrison’s defenders were suffering from sickness—the garrison negotiated a cease-fire with the Ottomans and on 29 April the British-Indian force of 8,000 surrendered to the Ottomans, including 300 men of the 1st Ox & Bucks. Many of the Ox & Bucks taken at Kut, like the rest of the prisoners, suffered mistreatment by the Ottomans and did not survive the war; it is estimated that just under 2,000 British and up to 3,000 Indians perished in captivity.
A Provisional Battalion had been formed in January 1916 from reinforcements intended for the 1st Ox & Bucks, joining the 28th (Garwhal) Brigade, 7th (Meerut) Division. The battalion joined the Lines of Communication (LoC) force and the Provisional Battalion was re-titled the 1st Battalion on 6 July 1917. On 19 October 1917 the Battalion transferred to the 50th Brigade, 15th Indian Division. By then, the British had taken Baghdad and were gradually pushing the Ottomans further back. Between 26–27 March 1918 it took part in fighting against the Ottomans at Khan Baghdadi. The Ottomans signed an Armistice with the Allies on 30 October, ending the war in the Middle East.
Italy and Macedonia
The 1/4th Ox & Bucks and 1/1st Buckinghamshire Battalion were part of the 145th (South Midland) Brigade, 48th (South Midland) Division that left the Western Front for Italy in November 1917—a member of the Allies since May 1915—after it suffered very heavy casualties and came close to collapsing after it was defeated at the Battle of Caporetto. The Regiment and the rest of the British forces did not take part in a major battle until June 1918 when they took part in the Battle of Asiago (15–16 June) that saw the Austro-Hungarians—an ally of Germany—successfully defeated in their offensive against the Allies; it was the last Austro-Hungarian offensive against Italy. On 23 October the Allies launched a successful offensive against Austria-Hungary, with the Regiment crossing the Piave River, taking part in the Battle of Vittorio Veneto. The Austro-Hungarians signed an Armistice with the Allies on 4 November 1918 and the 1/4th Ox & Bucks and 1/1st Buckinghamshires ended the war in Austria-Hungary.
In October 1915 the British and French landed in Salonika at the request of the Greek Prime Minister. The British 26th Division—including the 7th (Service) and 8th (Service) Battalions, Ox & Bucks—landed between December 1915 and February 1916. The Regiment’s time in the Balkans was mostly quiet, experiencing sporadic fighting, but it included the repulsing of a Bulgarian invasion of Greece at Lake Doiran in April–May 1917. The Regiment saw very heavy fighting against the Bulgarians around Doiran the following September, after the Allies had launched an offensive in July 1918 with the intention of ending the war in the Balkans. The war did end on 30 September 1918, with Bulgaria signing an Armistice with the Allies. The Ox & Bucks, along with the rest of the division, was subsequently employed for a brief period of time on occupation duties in Bulgaria.
Inter – War
1st Battalion
The 1st Ox & Bucks arrived in Archangel, Northern Russia in May 1919 as part of the Allied force that intervened in the Russian Civil War to assist the ‘White Russians’ in their fight against the Bolsheviks. The Battalion left later in the year, being based in Limerick, Ireland in 1920 to assist in operations against Sinn Féin and the IRA. It moved to Shorncliffe, England two years later. In 1925 the Battalion joined the British Army of Occupation in Germany, remaining there for two-years before heading for Parkhurst, England. The 1st Ox & Bucks remained in England until the outbreak of war in 1939.
2nd Battalion
In 1919 the 2nd Ox and Bucks left the Western Front, moving to Tipperary, Ireland to, like the 1st Battalion, take part in operations against the IRA and Sinn Féin. In March 1922 the Battalion arrived in Rawalpindi, India, later moving to Razmak in Waziristan on the North-West Frontier. In 1929 the Battalion moved to Maymo in Upper Burma and then to Rangoon. In 1934 the Battalion returned to India initially to Bareilly and then to Mhow where they remained until they left India in June 1940 arriving home the following month.
Second World War ( 1939-45 )
On 3rd September 1939—two days after Germany had invaded Poland—the British Empire, France, and their Allies declared war on Germany, beginning the Second World War. During the Second World War the Regiment raised 9 Battalions and the 3rd (Special Reserve) Training Battalion. The Regiment saw service in France, North Africa, Burma, Italy, Belgium, Netherlands and Germany.
North-West Europe (France and Belgium) 1939-1940
The British rapidly sent the British Expeditionary Force (BEF) to France in September, which included the 1st Ox & Bucks and the Territorial 1st Buckinghamshire Battalion, later joined by the 4th Ox & Bucks, all of which eventually became part of the 48th (South Midland) Division, with the 1st Ox & Bucks part of the 143rd Brigade and the 4th Ox & Bucks and 1st Buckinghamshires part of the 145th Brigade.
The Germans launched their invasion of the Low Countries on 10 May 1940, shattering a period of the conflict that was known as the Phoney War. The German invasion of northern Belgium—where the BEF was located—was a diversion with the main attack being through the poorly-defended Ardennes forest. The BEF withdrew west towards the Dendre river after the Dutch Army had surrendered, and then withdrew further towards the Scheldt river by 19 May. The British force, having given a good account of themselves in the defence of the Scheldt, eventually withdrew into France, moving towards the Dunkirk area where, on 26 May, the evacuation of the British force back to Britain began, known as Operation Dynamo (26 May-3 June). The 1st Ox & Bucks took part in the defence of the Ypres-Commines Canal (26–28 May) and was eventually evacuated, having suffered heavy casualties. The other battalions took part in the defence of Mount Cassel until 29 May where they eventually attempted a breakout though the 4th Battalion was encircled by German forces near Watou and being overwhelmed. The 1st Buckinghamshires, having also suffered heavily, made it to Dunkirk and was evacuated back to Britain. The Dunkirk evacuation was extremely successful, with over 330,000 British and French troops evacuated.
North-West Europe (D-Day to Germany) 1944-1945
1st Battalion The Buckinghamshire Battalion was part of the 6th Beach Group, landing on D-Day on 6 June 1944 as part of the beach group that organised the units on the landing beaches. In July the Battalion supplied companies for the Bridgehead defence particularly to the 2nd Ox and Bucks. The 1st Ox & Bucks landed later that month as part of the 71st Infantry Brigade, 53rd (Welsh) Division. On 25 June Operation Epsom began that was intended to take the town of Caen—a vital objective for the British that proved to be a formidable town to capture—and failed in its intention of capturing Caen though, however, it did divert significant numbers of Germans away from the Americans. The Germans counter-attacked and the Ox & Bucks moved to positions around the Odon where it suffered from heavy German artillery barrages. The Allies launched further attempts to capture Caen, and the first Allied troops entered it on 9 July; by then, much of it had been destroyed. Fighting around Caen continued for much of the month, with the Battalion sustaining significant casualties. In August the Battalion took part in an advance towards Falaise, known as Operation Totalize, that saw the Allies reach and capture it. The Falaise Pocket was eventually closed, encircling two German armies, one of which was effectively destroyed by the Allies. The victory of the Falaise Pocket signified the end of the battle for Normandy. The 1st Ox & Bucks then took part in the advance east, eventually entering Belgium in early September.
On 17 September the invasion of the Netherlands began, known as Operation Market Garden in a combined land and airborne operation. The Battalion took part in the ground operation that was intended to cross through three bridges taken by airborne troops and into Germany, that would end at the furthest captured bridge at Arnhem—taken by 1st Airborne—though the operation ended in failure by 25 September. The 1st Ox & Bucks subsequently took part in operations around the Lower Maas that took place between October and November. On 16 December 1944 the Germans launched their last-gasp major offensive of the war in the Ardennes that became known as the Battle of the Bulge. The 1st Ox & Bucks, along with the rest of its division, was rushed to Belgium shortly afterwards to assist in the defence where it experienced awful weather conditions, some of the worst Belgium had seen in years. The Allies launched a counter-attack in early January and the German offensive was defeated later that month, by which time the 53rd Welsh Division had been relieved and returned to Holland soon afterwards in preparation for the invasion of Germany.
In February the Battalion was involved in the Allied invasion of the German Rhineland, including taking part in the Battle of the Reichswald, where it saw extensive involvement. The Battalion crossed the Rhine in late March and advanced east, seeing action at, among others, Ibbenburen in April where they saw heavy fighting against determined German defenders though, in spite of this, the British succeeded in capturing the town, and the 1st Ox & Bucks eventually reached the city of Hamburg—captured on 3 May by British forces—where they remained until the end of the war.
2nd Battalion
In 1941 the 2nd Battalion re-roled as an airborne, specifically an Air Landing, unit, joining the 1st Airborne Division and in 1943 the 6th Airlanding Brigade, 6th Airborne Division. As part of Operation Deadstick just before the landings on D-Day 6 June 1944, D Company, 2nd Ox & Bucks Commanded by Maj. John Howard as well as Royal Engineers and men of the Glider Pilot Regiment (totalling 181 men), were to land via 6 Horsa gliders to capture the vital Pegasus Bridge over the Caen Canal and the bridge over the Orne River (known as Horsa Bridge and east of Pegasus). This was intended to secure the eastern flank to prevent German armour from reaching the British 3rd Infantry Division that was landing on Sword Beach.
Pegasus Bridge (Battle Honour on the RGJ Badge)
The Ox and Bucks landed very close to their objectives at 16 minutes past midnight—the first Allied unit to land in France—they poured out of their battered gliders, completely surprising the German defenders, and taking the bridges within 10 minutes, losing two men—Lieutenant Den Brotheridge and Lance-Corporal Greenhalgh—in the process. One Glider assigned to the capture of Horsa Bridge was landed at the bridge over the River Dives, some 7 miles from where they were meant to land. They, in spite of this, captured the River Dives bridge, advanced through German lines towards the village of Ranville where they eventually rejoined the British forces. The Ox & Bucks were reinforced half an hour after the landings by 7 Para, with further units arriving shortly afterwards. The Germans launched many attempts to re-capture the bridges, all being repulsed. Later in the day, at about 1:00pm, Lord Lovat and elements of his 1st Special Service Brigade arrived to relieve the exhausted defenders, followed by the British 3rd Infantry Division. The operation was immortalised in the film The Longest Day.
As the first day of the landings closed, more reinforcements arrived as part of Operation Mallard, they included the rest of the 2nd Ox & Bucks. Lieutenant Colonel Mark Darell-Brown DSO replaced Lieutenant Colonel Michael Roberts who had been injured during the landings and remained in command of the Battalion during the defence of the Ardennes and on the Rhine landing. On 7 June the Battalion captured the small village of Herouvillette and then headed for the village of Escoville where they met some extremely determined resistance. Having experienced intense fighting with German troops supported by armour and unable to successfully dig in and hold the village, the Battalion withdrew, moving back to Herouvillette where they took part in its defence. The Battalion subsequently held the line at Chateau St Come on Bréville ridge until August, then taking part in the British breakout and advance to the Seine that began in August, known as Operation Paddle. The Battalion crossed the River Touques and the advance continued through St Philibert, La Correspondance, Pretreville and Malbortie. On 25 August the Battalion was ordered to attack and capture the village of Manneville La Raoult, where a German Garrison was based. After heavy fighting, during which the enemy used mortar and artillery fire, by nightfall the Battalion had occupied the village and had captured a number of prisoners and transport. Lieutenant Freddie Scott was awarded a Military Cross for action which drove the enemy from a position from where his platoon had come under heavy attack by machine-gun fire and grenades. The battle for Manneville La Raoult was to be the last battle the Battalion fought in France. The following day, the Battalion moved to Foulbec. The 2nd Ox & Bucks, along with the rest of 6th Airborne, was withdrawn to the UK in early September to recuperate and reorganise. By then, of the original 181 men that had taken part in the Pegasus and Horsa operation, just 40 remained fit for active duty. The 2nd Ox and Bucks and the rest of the 6th Airborne were then rushed back to Belgium, by sea and land, to take part in the defence of the Ardennes, after the German invasion on 16 December. By the time the Battalion arrived in the Ardennes the German offensive had lost its momentum. One of its companies was involved in heavy fighting whilst in support of 13 Parachute Battalion in the village of Bure. The 2nd Ox and Bucks remained in the Ardennes until 24 January. The Battalion then moved 200 miles north to the River Maas, near Venlo, in Holland to defend the position there, before returning to the UK in late February.
The 2nd Ox and Bucks were once again involved in a gliderborne air assault landing, known as Operation Varsity, the objective of which was to cross the Rhine. Operation Varsity, which began on 24 March 1945, was the last major battle on the Western Front during the Second World War. The 2nd Ox and Bucks landed further east than any other British Army unit to capture bridges from the Germans. The Battalion, like many others during the assault, suffered heavily as the Germans met the landing gliders with ferocious fire in the air and on the ground, suffering hundreds of casualties. The 2nd Ox and Bucks casualties included 103 killed during the battle of the landing area. The Battalion had lost half its strength, companies were severely depleted and non commissioned officers were frequently required to act as platoon commanders. It saw very heavy fighting at Hamminkeln, where its objectives were the railway station and bridges over the River Issel between Hamminkeln and Ringenburg. Lieutenant Hugh Clark led a bayonet charge to take a road bridge for which he was awarded a Military Cross. CSM John Stevenson was awarded the Distinguished Conduct Medal for defeating several enemy attacks with a platoon he commanded on the east bank of the River Issel. The 2nd Ox and Bucks captured and held all its objectives. The Germans launched a number of counter-attacks, all of which were repelled. The Battalion subsequently took a leading part in the 300 mile advance across Germany, mostly on foot, including taking part in the opposed crossing of the Weser and eventually linking up with the Russians near the Baltic port of Wismar on 3 May 1945. The Battalion was selected to represent the British Army in providing the Guard of Honour for the meeting between British commander Field Marshal Montgomery and his Russian counterpart, Rokossovsky, at Wismar on 7 May 1945. 1,408 officers and other ranks of the Oxfordshire and Buckinghamshire Light Infantry lost their lives during the Second World War.
T-Force
During spring and summer 1945 two companies of the Buckinghamshire Battalion, along with the 5th Battalion of the King’s Regiment, were attached to a secretive unit known as T-Force. Their role was to locate Nazi scientists and military research facilities. The creation of T-Force had been inspired by James Bond author Ian Fleming who had created 30 Assault Unit, which worked alongside T-Force in Germany. They carried out investigations in Hanover, Bremen and Hamburg. Post-war, elements of the Bucks who had been attached to T-Force were absorbed into No.1 T Force which continued to search for military secrets in the Ruhr.
North Africa and Italy (1942-1945
The 7th Ox and Bucks, part of 56 (London) Division, took part in the final battle in Tunisia in 1942. The Battalion made a successful attack at Enfidaville following a 3000-mile road move from Iraq. In the Italian campaign 7th Ox and Bucks took part in the landings at Salerno and Anzio and had heavy casualties. The Battalion fought its way up Italy to the Gothic Line near Rimini. 7th Ox and Bucks were dispersed as reinforcements to other regiments in 56 Division in late 1944.
Far East (1944-1945)
The 6th Ox and Bucks served on the Arakan Front during the advance down the west coast of Burma in 1944/45. The Battalion fought at Akyab in 1944 and at the main Japanese Base at Tamandu in 1945. An advance party of 2nd Ox and Bucks was in India in August 1945 preparing for an airborne assault in the Far East.
Post-World War II (1945-1966)
In October 1945 the 2nd Battalion arrived in Palestine during turbulent times there. In 1946 the 1st Battalion deployed to Trieste—the following year the Free Territory of Trieste—as part of the British-American force there. The Battalion left in May 1947. In 1948, with the end of the Second World War, the British Government implemented substantial defence cuts, which involved all second battalions in the Line Infantry being amalgamated with the 1st Battalions, this included the Ox & Bucks. Following the amalgamation the Regiment was re-titled as the 1st Battalion The Oxfordshire and Buckinghamshire Light Infantry, 43rd and 52nd.
In 1949 the Regiment moved to Greece during the Greek Civil War. In October 1951, following a short period in Cyprus, the Regiment deployed to the British-controlled Suez Canal Zone in Egypt. There, the Regiment saw active service performing internal security duties. The Regiment left Suez in April 1953. It was subsequently based in Osnabrück, West Germany as part of the British Army of the Rhine (BAOR). In July 1956 the Regiment took part in operations against EOKA terrorists in Cyprus. On the 7th of November 1958, after transferring from the Light Infantry Brigade to the Green Jackets Brigade, the Regiment was re-titled as the 1st Green Jackets (43rd and 52nd) and subsequently left Cyprus for home—the first time it had been based in the UK since 1939. The Regimental Depot which had been at Cowley Barracks, Oxford from 1876 to 1957 moved to Peninsula Barracks, Winchester in 1958. The Regiment was based at Warminster from 1959 to 1962 when it became the first regiment to be posted to the Far East without any National Servicemen following the end of conscription in 1961.
In April 1962, almost two years after the Malayan Emergency was declared over, the 1st Green Jackets (43rd and 52nd) arrived in the Malayan state of Penang. Peace did not reign for long and the Regiment led by Lieutenant Colonel Tod Sweeney MC was deployed to Brunei on the island of Borneo in December 1962, after an Indonesian-backed uprising occurred. In 1963, while still in Borneo, the 1st Green Jackets (43rd and 52nd) was re-designated as a rifle regiment to conform to the rest of the Green Jackets Brigade. The Regiment returned to Penang in April 1963. The Regiment was later involved in further operations in North Borneo and Sarawak. In March 1965 the Regiment was posted to West Berlin – its last overseas deployment as a regiment. On 1 January 1966 the Regiment amalgamated with the two other regiments of the Green Jackets Brigade to form the three battalion Royal Green Jackets, the 1st Green Jackets (43rd and 52nd) becoming the 1st Battalion Royal Green Jackets. The battalion was disbanded in 1992 as a consequence of Options for Change and the 2nd Battalion (formerly The King’s Royal Rifle Corps) was re-designated as the 1st Battalion. The 3rd Battalion was renumbered as the 2nd. In the February of 2007 the 1st Battalion The Royal Green Jackets became the 2nd Battalion The Rifles and the 2nd Battalion The Royal Green Jackets became the 4th Battalion The Rifles.
The Original Para
Thanks to Alan Jackson & Lee Muckley for 2 of the pictures on this page
just a few random pictures of the old Peninsula Barracks and Winchester Cathedral. This historical city is a must to visit. Every Green Jacket I know holds this city in high esteem, our second home. We were all so young, yet this city is the one we remember best…
Peninsula (Media Montage) Photography: S. Barrett Music: Sunset, Silver Bugles (Sound of Light)
[jwplayer config=”Steve WL Band” mediaid=”811″]
Former Peninsula Barracks, September 2011
(Gallery arrangement)
[nggallery id=3]
(Canon EOS 550D)
The original picture quality is slightly reduced, due to web devices usage
On Sunday 18th June 1815 Napoleon’s armies of France fought against the Anglo-Allies commanded by the Duke of Wellington in what was to be Napoleon’s last stand.
The Battle of Waterloo was fought on Sunday, 18th June 1815, near Waterloo in present-day Belgium, then part of the United Kingdom of the Netherlands. An Imperial French army under the command of Emperor Napoleon was defeated by the armies of the Seventh Coalition, comprising an Anglo-allied army under the command of the Duke of Wellington combined with a Prussian army under the command of Gerhard von Blücher. It was the culminating battle of the Waterloo Campaign and Napoleon’s last. The defeat at Waterloo ended his rule as Emperor of the French, marking the end of his Hundred Days return from exile.
Upon Napoleon’s return to power in 1815, many states that had opposed him formed the Seventh Coalition and began to mobilise armies. Two large forces under Wellington and Blücher assembled close to the north-eastern border of France. Napoleon chose to attack in the hope of destroying them before they could join in a coordinated invasion of France with other members of the coalition. The decisive engagement of this three-day Waterloo Campaign (16th–19th June 1815) occurred at the Battle of Waterloo. According to Wellington, the battle was “the nearest-run thing you ever saw in your life”.
Napoleon delayed giving battle until noon on 18th June to allow the ground to dry. Wellington’s army, positioned across the Brussels road on the Mont-Saint-Jean escarpment, withstood repeated attacks by the French, until, in the evening, the Prussians arrived in force and broke through Napoleon’s right flank. At that moment, Wellington’s Anglo-allied army counter-attacked and drove the French army in disorder from the field. Pursuing coalition forces entered France and restored King Louise XVIII to the French throne. Napoleon abdicated, surrendered to the British, and was exiled to Saint Helena, where he died in 1821.
The battlefield is in present-day Belgium, about 8 miles (13 km) south by south-east of Brussels, and about 1 mile (1.6 km) from the town of Waterloo. The site of the battlefield is today dominated by a large monument, the Lions Mound. As this mound was constructed from earth taken from the battlefield itself, the contemporary topography of the part of the battlefield around the mound has not been preserved.
On 13th March 1815, six days before Napoleon reached Paris, the powers at the Congress of Vienna declared him an outlaw. Four days later, the United Kingdom, Russia, Austria, and Prussia mobilised armies to defeat Napoleon. Napoleon knew that once his attempts at dissuading one or more of the Seventh Coalition allies from invading France had failed, his only chance of remaining in power was to attack before the coalition mobilised. If he could destroy the existing coalition forces south of Brussels before they were reinforced, he might be able to drive the British back to the sea and knock the Prussians out of the war. An additional consideration was that there were many French-speaking sympathisers in Belgium and a French victory might trigger a friendly revolution there. Also, the British troops in Belgium were largely second-line troops; most of the veterans of the Peninsular War had been sent to America to fight the War of 1812.
Map of the Waterloo campaign
Wellington’s initial dispositions were intended to counter the threat of Napoleon enveloping the Coalition armies by moving through Mons to the south-west of Brussels. This would have cut Wellington’s communications with his base at Ostend, but would have pushed his army closer to Blücher’s. Napoleon manipulated Wellington’s fear of this loss of his supply chain from the channel ports with false intelligence. He divided his army into a left wing commanded by Marshal Ney, a right wing commanded by Marshal Grouchy, and a reserve, which he commanded personally (although all three elements remained close enough to support one another). Crossing the frontier near Charleroi before dawn on 15th June, the French rapidly overran Coalition outposts, securing Napoleon’s “central position” between Wellington’s and Blücher’s armies.
Only very late on the night of 15th June was Wellington certain that the Charleroi attack was the main French thrust. In the early hours of 16 June, at the Duchess of Richmond`s ball in Brussels, he received a dispatch from the Prince of Orangeand was shocked by the speed of Napoleon’s advance. He hastily ordered his army to concentrate on Quatre Bras, where the Prince of Orange, with the brigade of Princess Bernard of Saxe-Weimar, was holding a tenuous position against the soldiers of Ney’s left wing.Ney’s orders were to secure the crossroads of Quatre Bras, so that, if necessary, he could later swing east and reinforce Napoleon.
Napoleon moved against the concentrated Prussian army first. On 16th June, with a part of the reserve and the right wing of the army, he attacked and defeated Blücher’s Prussians at the Battle of Ligny. The Prussian centre gave way under more heavy French assaults, but the flanks held their ground. Ney, meanwhile, found the crossroads of Quatre Braslightly held by the Prince of Orange, who successfully repelled Ney’s initial attacks, but was gradually driven back by overwhelming numbers of French troops. First reinforcements and then Wellington himself arrived. He took command and drove Ney back, securing the crossroads by early evening, but too late to send help to the Prussians, who were defeated at theBattle of Lignyon the same day. The Prussian defeat made Wellington’s position at Quatre Bras untenable, so the next day he withdrew northwards, to a defensive position he had personally reconnoitredthe previous year—the low ridgeof Mont-Saint-Jean, south of the village of Waterlooand the Sonian Forest.
The Prussian retreat from Ligny went uninterrupted, and seemingly unnoticed, by the French.The bulk of their rearguard units held their positions until about midnight, and some elements did not move out until the following morning, completely ignored by the French.Crucially, the Prussians did not retreat to the east, along their own lines of communication. Instead, they too fell back northwards—parallel to Wellington’s line of march, still within supporting distance, and in communication with him throughout. The Prussians rallied on Bulow`s IV Corps, which had not been engaged at Ligny and was in a strong position south of Wavre.
Napoleon, with the reserves, made a late start on 17th June and joined Ney at Quatre Bras at 13:00 to attack Wellington’s army, but found the position empty. The French pursued Wellington, but the result was only a brief cavalry skirmish in Gennappejust as torrential rain set in for the night. Before leaving Ligny, Napoleon ordered Grouchy, commander of the right wing, to follow up the retreating Prussians with 33,000 men. A late start, uncertainty about the direction the Prussians had taken, and the vagueness of the orders given to him meant that Grouchy was too late to prevent the Prussian army reaching Wavre, from where it could march to support Wellington. By the end of 17 June, Wellington’s army had arrived at its position at Waterloo, with the main body of Napoleon’s army following. Blücher’s army was gathering in and around Wavre, around 8 miles (13 km) to the east of the city.
Napoleon’s headquarters during the battle,
the Caillou (“Pebble”) Farm
The resurgent Napoleon`s strategy
was to isolatethe Allied and Prussian
armies and annihilate each one separately
Three armies were involved in the battle: Napoleon’s Armée du Nord; a multinational army under Wellington; and a Prussian army under Blücher.
The French army of around 69,000 consisted of 48,000 infantry, 14,000 cavalry, and 7,000 artillery with 250 guns.Napoleon had used conscription to fill the ranks of the French army throughout his rule, but he did not conscript men for the 1815 campaign. All his troops were veterans of at least one campaign who had returned more or less voluntarily to the colours. The cavalry in particular was both numerous and formidable, and included fourteen regiments of armoured heavy cavalry and seven of highly versatile lancers.
Wellington claimed that he himself had “an infamous army, very weak and ill-equipped, and a very inexperienced Staff”.His troops consisted of 67,000 men: 50,000 infantry, 11,000 cavalry, and 6,000 artillery with 150 guns. Of these, 25,000 were British, with another 6,000 from the King`s German Legion. All of the British Army troops were regular soldiers but only 7,000 of them were Peninsular War veterans.In addition, there were 17,000 Dutch and Belgian troops, 11,000 from Hanover, 6,000 from Brunswick, and 3,000 from Nassau.
Many of the troops in the Coalition armies were inexperienced.The Dutch army had been re-established in 1815, following the earlier defeat of Napoleon. With the exception of the British and some from Hanover and Brunswick who had fought with the British army in Spain, many of the professional soldiers in the Coalition armies had spent some of their time in the French army or in armies allied to the Napoleonic regime. Wellington was also acutely short of heavy cavalry, having only seven British and three Dutch regiments. The Duke of Yorkimposed many of his staff officers on Wellington, including his second-in-command, the Earl of Uxbridge. Uxbridge commanded the cavalry and had carte blanchefrom Wellington to commit these forces at his discretion. Wellington stationed a further 17,000 troops at Halle, 8 miles (13 km) away to the west; they were not recalled to participate in the battle but were to serve as a fallback position should the battle be lost. They were mostly composed of Dutch troops under Prince of Orange’s younger brother Prince Frederik of the Netherlands.
The Prussian army was in the throes of reorganisation. In 1815, the former Reserve regiments, Legions, and Freikorps volunteer formations from the wars of 1813–1814 were in the process of being absorbed into the line, along with many Landwehr (militia) regiments. The Landwehr were mostly untrained and unequipped when they arrived in Belgium. The Prussian cavalry were in a similar state. Its artillery was also reorganising and did not give its best performance – guns and equipment continued to arrive during and after the battle. Off-setting these handicaps, however, the Prussian Army did have excellent and professional leadership in its General Staff organisation. These officers came from four schools developed for this purpose and thus worked to a common standard of training. This system was in marked contrast to the conflicting, vague orders issued by the French army. This staff system ensured that before Ligny, three-quarters of the Prussian army concentrated for battle at 24 hours notice. After Ligny, the Prussian army, although defeated, was able to realign its supply train, reorganise itself, and intervene decisively on the Waterloo battlefield within 48 hours. Two and a half Prussian army corps, or 48,000 men, were engaged at Waterloo – two brigades under Friedrich von Bulow, commander of IV Corps, attacked Lobau at 16:30, while Zieten`s I Corps and parts of George von Pirch`s II Corps engaged at about 18:00.
The Battlefield
The Waterloo position was a strong one. It consisted of a long ridge running east-west, perpendicular to, and bisected by, the main road to Brussels. Along the crest of the ridge ran the Ohain road, a deep sunken lane. Near the crossroads with the Brussels road was a large elm tree that was roughly in the centre of Wellington’s position and served as his command post for much of the day. Wellington deployed his infantry in a line just behind the crest of the ridge following the Ohain road. Using the reverse slope, as he had many times previously, Wellington concealed his strength from the French, with the exception of his skirmishers and artillery. The length of front of the battlefield was also relatively short at 2.5 miles (4.0 km). This allowed Wellington to draw up his forces in depth, which he did in the centre and on the right, all the way towards the village of Braine-I`Alleud, in the expectation that the Prussians would reinforce his left during the day.
n front of the ridge, there were three positions that could be fortified. On the extreme right were the château, garden, and orchard of Hougoumont. This was a large and well-built country house, initially hidden in trees. The house faced north along a sunken, covered lane (usually described by the British as “the hollow-way”) along which it could be supplied. On the extreme left was the hamlet of Papelotte. Both Hougoumont and Papelotte were fortified and garrisoned, and thus anchored Wellington’s flanks securely. Papelotte also commanded the road to Wavre that the Prussians would use to send reinforcements to Wellington’s position. On the western side of the main road, and in front of the rest of Wellington’s line, was the farmhouse and orchard of La Haye Sainte, which was garrisoned with 400 light infantry of the King`s German Legion.On the opposite side of the road was a disused sand quarry, where the 95th Rifles were posted as sharpshooters. This position presented a formidable challenge to an attacker. Any attempt to turn Wellington’s right would entail taking the entrenched Hougoumont position; any attack on his right centre would mean the attackers would have to march between enfilading fire from Hougoumont and La Haye Sainte. On the left, any attack would also be enfiladed by fire from La Haye Sainte and its adjoining sandpit, and any attempt at turning the left flank would entail fighting through the streets and hedgerows of Papelotte, and some very wet ground. The French army formed on the slopes of another ridge to the south. Napoleon could not see Wellington’s positions, so he drew his forces up symmetrically about the Brussels road. On the right was I Corps under d`Erlon with 16,000 infantry and 1,500 cavalry, plus a cavalry reserve of 4,700. On the left was II Corps under Reille with 13,000 infantry, and 1,300 cavalry, and a cavalry reserve of 4,600. In the centre about the road south of the inn La Belle Alliance were a reserve including Lobau’s VI Corps with 6,000 men, the 13,000 infantry of the Imperial Guard, and a cavalry reserve of 2,000. In the right rear of the French position was the substantial village of Plancenoit, and at the extreme right, the Bois de Paris wood. Napoleon initially commanded the battle from Rossomme farm, where he could see the entire battlefield, but moved to a position near La Belle Alliance early in the afternoon. Command on the battlefield (which was largely hidden from his view) was delegated to Ney.
Battlefield Preparation
Wellington rose at around 02:00 or 03:00 on 18 June, and wrote letters until dawn. He had earlier written to Blücher confirming that he would give battle at Mont-Saint-Jean if Blücher could provide him with at least one corps; otherwise he would retreat towards Brussels. At a late-night council, Blücher’s chief of staff, August Neidhart von Gneisenau, had been distrustful of Wellington’s strategy, but Blücher persuaded him that they should march to join Wellington’s army. In the morning Wellington duly received a reply from Blücher, promising to support him with three corps. From 06:00 Wellington was in the field supervising the deployment of his forces. At Wavre, the Prussian IV Corps under Bülow was designated to lead the march to Waterloo as it was in the best shape, not having been involved in the Battle of Ligny. Although they had not taken casualties, IV Corps had been marching for two days, covering the retreat of the three other corps of the Prussian army from the battlefield of Ligny. They had been posted farthest away from the battlefield, and progress was very slow. The roads were in poor condition after the night’s heavy rain, and Bülow’s men had to pass through the congested streets of Wavre and move up 88 artillery pieces. Matters were not helped when a fire broke out in Wavre, blocking several streets along Bülow’s intended route. As a result, the last part of the corps left at 10:00, six hours after the leading elements had moved out towards Waterloo. Bülow’s men were followed to Waterloo first by I Corps and then by II Corps.
Napoleon breakfasted off silver plate at Le Caillou, the house where he had spent the night. When Soult suggested that Grouchy should be recalled to join the main force, Napoleon said, “Just because you have all been beaten by Wellington, you think he’s a good general. I tell you Wellington is a bad general, the English are bad troops, and this affair is nothing more than eating breakfast”. However, Napoleon’s surprisingly dismissive statements should not be taken at face value, given the Emperor’s maxim that “in war, morale is everything” and that praising the enemy is always wrong, as it reduces one’s morale. Indeed, he had been seen engaging in such pre-battle, morale-boosting harangues on a number of occasions in the past and on the morning of the battle of Waterloo he had to deal with his chief of staff’s pessimism and nervousness and had to respond to several persistent and almost defeatist objections from some of his senior generals. Later on, being told by his brother, Jerome, of some gossip overheard by a waiter between British officers at lunch at the ‘King of Spain’ inn in Genappe that the Prussians were to march over from Wavre, Napoleon declared that the Prussians would need at least two days to recover and would be dealt with by Grouchy. Surprisingly, Jerome’s overheard gossip aside, the French commanders present at the pre-battle conference at Le Caillou had no information about the alarming proximity of the Prussians and did not suspect that Blücher’s men would start erupting onto the field of battle in great numbers just five hours later.
Napoleon had delayed the start of the battle owing to the sodden ground, which would have made manoeuvring cavalry and artillery difficult. In addition, many of his forces had bivouacked well to the south of La Belle Alliance. At 10:00, in response to a dispatch he had received from Grouchy six hours earlier, he sent a reply telling Grouchy to “head for Wavre [to Grouchy’s north] in order to draw near to us [to the west of Grouchy]” and then “push before him” the Prussians to arrive at Waterloo “as soon as possible”.
At 11:00, Napoleon drafted his general order: Reille’s Corps on the left and d’Erlon’s Corps to the right were to attack the village of Mont-Saint-Jean and keep abreast of one another. This order assumed Wellington’s battle-line was in the village, rather than at the more forward position on the ridge. To enable this, Jerome’s division would make an initial attack on Hougoumont, which Napoleon expected would draw in Wellington’s reserves, since its loss would threaten his communications with the sea. A grande batterie of the reserve artillery of I, II, and VI Corps was to then bombard the centre of Wellington’s position from about 13:00. D’Erlon’s corps would then attack Wellington’s left, break through, and roll up his line from east to west. In his memoirs, Napoleon wrote that his intention was to separate Wellington’s army from the Prussians and drive it back towards the sea.
Hougomount
The historian Andrew Roberts notes that “It is a curious fact about the Battle of Waterloo that no one is absolutely certain when it actually began”. Wellington recorded in his dispatches that at “about ten o’clock [Napoleon] commenced a furious attack upon our post at Hougoumont”. Other sources state that the attack began around 11:30. The house and its immediate environs were defended by four light companies of Guards, and the wood and park by Hanoverian jager and the 1/2nd Nassau. The initial attack by Bauduin’s brigade emptied the wood and park, but was driven back by heavy British artillery fire, and cost Bauduin his life. As the British guns were distracted by a duel with French artillery, a second attack by Soye’s brigade and what had been Bauduin’s succeeded in reaching the north gate of the house. Some French troops managed to enter its courtyard before the gate was re-secured. The 2nd Coldstream Guards and 2nd / 3rd Foot Guards then arrived and repulsed the attack.
Fighting continued around Hougoumont all afternoon. Its surroundings were heavily invested by French light infantry, and coordinated attacks were made against the troops behind Hougoumont. Wellington’s army defended the house and the hollow way running north from it. In the afternoon, Napoleon personally ordered the house to be shelled to set it on fire, resulting in the destruction of all but the chapel. Du Plat’s brigade of the King’s German Legion was brought forward to defend the hollow way, which they had to do without senior officers. Eventually they were relieved by the 71st Foot, a British infantry regiment. Adam’s brigade was further reinforced by Hugh Halkett`s 3rd Hanoverian Brigade, and successfully repulsed further infantry and cavalry attacks sent by Reille. Hougoumont held out until the end of the battle.
I had occupied that post with a detachment from General Byng’s brigade of Guards, which was in position in its rear; and it was some time under the command of Lieutenant-Colonel MacDonald, and afterwards of Colonel Home; and I am happy to add that it was maintained, throughout the day, with the utmost gallantry by these brave troops, notwithstanding the repeated efforts of large bodies of the enemy to obtain possession of it.
—Wellington,
When I reached Lloyd’s abandoned guns, I stood near them for about a minute to contemplate the scene: it was grand beyond description. Hougoumont and its wood sent up a broad flame through the dark masses of smoke that overhung the field; beneath this cloud the French were indistinctly visible. Here a waving mass of long red feathers could be seen; there, gleams as from a sheet of steel showed that the cuirassiers were moving; 400 cannon were belching forth fire and death on every side; the roaring and shouting were indistinguishably commixed—together they gave me an idea of a labouring volcano. Bodies of infantry and cavalry were pouring down on us, and it was time to leave contemplation, so I moved towards our columns, which were standing up in square.
—Major Macready, Light Division, 30th British Regiment, Halkett’s brigade,
The fighting at Hougoumont has often been characterised as a diversionary attack to draw in Wellington’s reserves which escalated into an all-day battle and drew in French reserves instead. In fact there is a good case to believe that both Napoleon and Wellington thought that holding Hougoumont was key to winning the battle. Hougoumont was a part of the battlefield that Napoleon could see clearly, and he continued to direct resources towards it and its surroundings all afternoon (33 battalions in all, 14,000 troops). Similarly, though the house never contained a large number of troops, Wellington devoted 21 battalions (12,000 troops) over the course of the afternoon in keeping the hollow way open to allow fresh troops and ammunition to reach the buildings. He moved several artillery batteries from his hard-pressed centre to support Hougoumont, and later stated that “the success of the battle turned upon closing the gates at Hougoumont”.
The first French infantry attack
The 80 guns of Napoleon’s grande batterie drew up in the centre. These opened fire at 11:50, according to Lord Hill (commander of the Anglo-allied II Corps), while other sources put the time between noon and 13:30. The grande batterie was too far back to aim accurately, and the only other troops they could see were skirmishers of the regiments of Kempt and Pack, and Perponchers`s 2nd Dutch division (the others were employing Wellington’s characteristic ” reverse slope defence”). Nevertheless, the bombardment caused a large number of casualties. Though some projectiles buried themselves in the soft soil, most found their marks on the reverse slope of the ridge. The bombardment forced the cavalry of the Union Brigade (in third line) to move to its left, as did the Scots Greys, to reduce their casualty rate.
At about 13:00, Napoleon saw the first columns of Prussians around the village of Lasne-Chapple-Saint-Lambert, four or five miles (three hours march for an army) away from his right flank. Napoleon’s reaction was to have Marshal Soult send a message to Grouchy telling him to come towards the battlefield and attack the arriving Prussians. Grouchy, however, had been executing Napoleon’s previous orders to follow the Prussians “with your sword against his back” towards Wavre, and was by then too far away to reach Waterloo. Grouchy was advised by his subordinate, Gerard, to “march to the sound of the guns”, but stuck to his orders and engaged the Prussian III Corps rear guard under the command of Lieutenant-General Baron John von Thielmann at the Battle of Wavre. Moreover, Soult’s letter ordering Grouchy to move quickly to join Napoleon and attack Bülow wouldn’t actually reach Grouchy until after 18:00.
A little after 13:00, I Corps’ attack began. D’Erlon, like Ney, had encountered Wellington in Spain, and was aware of the British commander’s favoured tactic of using massed short-range musketry to drive off infantry columns. Rather than use the usual nine-deep French columns deployed abreast of one another, therefore, each division advanced in closely spaced battalion lines behind one another. This allowed them to concentrate their fire,but it did not leave room for them to change formation.
The formation was initially effective. Its leftmost division, under Francois-Xavier Donzelot, advanced on La Haye Sainte. While one battalion engaged the defenders from the front, the following battalions fanned out to either side and, with the support of several squadrons of cuirassiers, succeeded in isolating the farmhouse. The Prince of Orange saw that La Haye Sainte had been cut off, and tried to reinforce it by sending forward the Hanoverian Lüneberg Battalion in line. Cuirassiers concealed in a fold in the ground caught and destroyed it in minutes, and then rode on past La Haye Sainte almost to the crest of the ridge, where they covered d’Erlon’s left flank as his attack developed.
At about 13:30, d’Erlon started to advance his three other divisions, some 14,000 men over a front of about 1,000 metres (1,094 yds) against Wellington’s left wing. At the point they aimed for they faced 6,000 men: the first line consisted of the Dutch 1st “Bijlandt” brigade of the 2nd Dutch division, flanked by the British regiments of Kempt and Pack on either side. The second line consisted of British and Hanoverian troops under Sir Thomas Picton, who were lying down in dead ground behind the ridge. All had suffered badly at Quatre Bras. In addition, the Bijlandt brigade had been ordered to deploy its skirmishers in the hollow road and on the forward slope. The rest of the brigade was lying down just behind the road.
At the moment these skirmishers were rejoining their parent battalions the brigade was ordered to its feet and started to return fire. On the left of the brigade, where the 7th Dutch Militia stood, a “few files were shot down and an opening in the line thus occurred” .The battalion had no reserves and was unable to close the gap.D’Erlon’s troops pushed through this gap in the line and the remaining battalions in the Bijlandt brigade (8th Dutch Militia and Belgian 7th Line Battalion) were forced to retreat to the square of the 5th Dutch Militia, which was in reserve between Picton’s troops, about 100 paces to the rear. There they regrouped under the command of Colonel Van Zuylen van Nijevlt.A moment later the Prince of Orange ordered a counterattack, which actually occurred around 10 minutes later. Bylandt was wounded and retired of the field, passing command of the Brigade to Lt. Kol. De Jongh.
In the mean time, d’Erlon’s men began to ascend the slope, and as they did so, Picton’s men stood up and opened fire. The French infantry returned fire and successfully pressed the British troops; although the attack faltered at the centre the line in front of d’Erlon’s left started to crumble. Picton was killed after ordering the counter-attack and the British and Hanoverian troops also began to give way under the pressure of numbers.
British Cavalry Charge
“Wellington,
Our officers of cavalry have acquired a trick of galloping at everything. They never consider the situation, never think of manoeuvring before an enemy, and never keep back or provide a reserve.”
At this crucial juncture, Uxbridge ordered his two brigades of British heavy cavalry, formed unseen behind the ridge, to charge in support of the hard-pressed infantry. The 1st Brigade, known as the Household Brigade, commanded by Major-General Lord Edward Somerset, consisted of guards regiments: the 1stand 2nd Life Guards, the Royal Horse Guards (the Blues), and the 1st (King`s) Dragoon Guards. The 2nd Brigade, also known as the Union Brigade, commanded by Major-General Sir William Ponsonby, was so called as it consisted of an English, the 1st (The Royals); a Scottish, 2nd (`Scots Greys`); and an Irish, 6th (Inniskilling); regiment of heavy dragoons. More than 20 years of warfare had eroded the numbers of suitable cavalry mounts available on the European continent; this resulted in the British heavy cavalry entering the 1815 campaign with the finest horses of any contemporary cavalry arm. They also received excellent mounted swordsmanship training. They were, however, inferior to the French in manoeuvring in large formations, cavalier in attitude, and unlike the infantry had scant experience of warfare. According to Wellington, they had little tactical ability or common sense.The two brigades had a combined field strength of about 2,000 (2,651 official strength); they charged with the 47-year-old Uxbridge leading them and a very inadequate number of squadrons held in reserve.There is evidence that Uxbridge gave an order, the morning of the battle, to all cavalry brigade commanders to commit their commands on their own initiative, as direct orders from himself might not always be forthcoming, and to “support movements to their front”. It appears that Uxbridge expected the brigades of Sir John Ormsby Vaneleur, Hussey Vivian and the Dutch cavalry to provide support to the British heavies. Uxbridge later regretted leading the charge in person, saying “I committed a great mistake”, when he should have been organising an adequate reserve to move forward in support.
The Household Brigade crossed the crest of the Allied position and charged downhill. The cuirassiers guarding d’Erlon’s left flank were still dispersed, and so were swept over the deeply sunken main road and then routed.The sunken lane acted as a trap, funnelling the flight of the French cavalry to their own right and away from the British cavalry. Some of the cuirassiers then found themselves hemmed in by the steep sides of the sunken lane, with a confused mass of their own infantry in front of them, the 95th Rifles firing at them from the north side of the lane, and Somerset’s heavy cavalry still pressing them from behind.The novelty of fighting armoured foes impressed the British cavalrymen, as was recorded by the commander of the Household Brigade.
The blows of the sabres on the cuirasses sounded like braziers at work.
– Lord Edward Somerset,
Continuing their attack, the squadrons on the left of the Household Brigade then destroyed Aulard’s brigade. Despite attempts to recall them, however, they continued past La Haye Sainte and found themselves at the bottom of the hill on blown horses facing Schmitz’s brigade formed in squares.
To their left, the Union Brigade suddenly swept through the infantry lines (giving rise to the legend that some of the 92nd Gordon Highland Regiment clung onto their stirrups and accompanied them into the charge).From the centre leftwards, the Royal Dragoons destroyed Bourgeois’ brigade, capturing the eagle of the 105th Ligne. The Inniskillings routed the other brigade of Quoit’s division, and the Greys destroyed most of Nogue’s brigade, capturing the eagle of the 45th Ligne. On Wellington’s extreme left, Pierre Francois Joseph Durutte`s division had time to form squares and fend off groups of Greys.
As with the Household Cavalry, the officers of the Royals and Inniskillings found it very difficult to rein back their troops, who lost all cohesion. James Hamilton, commander of the Greys (who were supposed to form a reserve) ordered a continuation of the charge to the French grande batterie. Though the Greys had neither the time nor means to disable the cannon or carry them off, they put very many out of action as the gun crews were killed or fled the battlefield.
Napoleon promptly responded by ordering a counter-attack by the cuirassier brigades of Farine and Travers and Jaquinot’s two Chevau-leger(lancer) regiments in the I Corps light cavalary division. The result was very heavy losses for the British cavalry.All figures quoted for the losses of the cavalry brigades as a result of this charge are estimates, as casualties were only noted down after the day of the battle and were for the battle as a whole.Some historians believe the official rolls tend to overestimate the number of cavalrymen present in their squadrons on the field of battle and that the proportionate losses were, as a result, considerably higher than the numbers on paper might suggest.The Union Brigade lost heavily in both officers and men killed (including its commander, William Ponsonby, and Colonel Hamilton of the Scots Greys) and wounded. The 2nd Life Guards and the King’s Dragoon Guards of the Household Brigade also lost heavily (with Colonel Fuller, commander of the King’s DG, killed). However, the 1st Life Guards, on the extreme right of the charge, and the Blues, who formed a reserve, had kept their cohesion and consequently suffered significantly fewer casualties. A counter-charge, by British light dragoons under Major-General Vandeleur and Dutch-Belgian light dragoons and hussars under Major-General Ghigny on the left wing, and Dutch-Belgian carabiniers under Major-General Trip in the centre, repelled the French cavalry.
Many popular histories suggest that the British heavy cavalry were destroyed as a viable force following their first, epic charge. Examination of eyewitness accounts reveal, however, that far from being ineffective, they continued to provide very valuable services. They counter-charged French cavalry numerous times (both brigades),halted a combined cavalry and infantry attack (Household Brigade only),were used to bolster the morale of those units in their vicinity at times of crisis, and filled gaps in the Anglo-allied line caused by high casualties in infantry formations (both brigades).This service was rendered at a very high cost, as close combat with French cavalry, carbine fire, infantry musketry and – more deadly than all of these – artillery fire steadily eroded the number of effectives in the two brigades.At the end of the fighting the two brigades, by this time combined, could muster one squadron.
Some 20,000 French troops had been committed to this attack. Its failure cost Napoleon not only heavy casualties – 3,000 prisoners were taken – but valuable time, as the Prussians now began to appear on the field to his right. Napoleon sent his reserve, Lobau’s VI corps and two cavalry divisions, some 15,000 troops, to hold them back. With this, Napoleon had committed all of his infantry reserves, except the Guard, and he now had to beat Wellington not only quickly, but with inferior numbers.
French Cavalry Attack
A little before 16:00, Ney noted an apparent exodus from Wellington’s centre. He mistook the movement of casualties to the rear for the beginnings of a retreat, and sought to exploit it. Following the defeat of d’Erlon’s Corps, Ney had few infantry reserves left, as most of the infantry been committed either to the futile Hougoumont attack or to the defence of the French right. Ney therefore tried to break Wellington’s centre with cavalry alone. Initially Milhuad`s reserve cavalry corps of cuirassiers and Lefebvre-Desnoettes` light cavalry division of the Imperial Guard, some 4,800 sabres, were committed. When these were repulsed, Kellermann`s heavy cavalry corps and Guyot`s heavy cavalry of the Guard were added to the massed assault, a total of around 9,000 cavalry in 67 squadrons.
Wellington’s infantry responded by forming squares (hollow box-formations four ranks deep). Squares were much smaller than usually depicted in paintings of the battle – a 500-man battalion square would have been no more than 60 feet (18 m) in length on a side. Vulnerable to artillery or infantry, squares that stood their ground were deadly to cavalry, because they could not be outflanked and because horses would not charge into a hedge of bayonets. Wellington ordered his artillery crews to take shelter within the squares as the cavalry approached, and to return to their guns and resume fire as they retreated.
Witnesses in the British infantry recorded as many as 12 assaults, though this probably includes successive waves of the same general attack; the number of general assaults was undoubtedly far fewer. Kellermann, recognising the futility of the attacks, tried to reserve the elite carabinier brigade from joining in, but eventually Ney spotted them and insisted on their involvement.
A British eyewitness of the first French cavalry attack, an officer in the Foot Guards, recorded his impressions very lucidly and somewhat poetically:
“Captain Rees Howell Gronow, Foot Guards,
About four p.m., the enemy’s artillery in front of us ceased firing all of a sudden, and we saw large masses of cavalry advance: not a man present who survived could have forgotten in after life the awful grandeur of that charge. You discovered at a distance what appeared to be an overwhelming, long moving line, which, ever advancing, glittered like a stormy wave of the sea when it catches the sunlight. On they came until they got near enough, whilst the very earth seemed to vibrate beneath the thundering tramp of the mounted host. One might suppose that nothing could have resisted the shock of this terrible moving mass. They were the famous cuirassiers, almost all old soldiers, who had distinguished themselves on most of the battlefields of Europe. In an almost incredibly short period they were within twenty yards of us, shouting “Vive l’Empereur!” The word of command, “Prepare to receive cavalry”, had been given, every man in the front ranks knelt, and a wall bristling with steel, held together by steady hands, presented itself to the infuriated cuirassiers.”
In essence this type of massed cavalry attack relied almost entirely on psychological shock for effect. Close artillery support could disrupt infantry squares and allow cavalry to penetrate; at Waterloo, however, co-operation between the French cavalry and artillery was not impressive. The French artillery did not get close enough to the Anglo-allied infantry in sufficient numbers to be decisive. Artillery fire between charges did produce mounting casualties, but most of this fire was at relatively long range and was often indirect, at targets beyond the ridge. If infantry being attacked held firm in their square defensive formations, and were not panicked, cavalry on their own could do very little damage to them. The French cavalry attacks were repeatedly repelled by the steadfast infantry squares, the harrying fire of British artillery as the French cavalry recoiled down the slopes to regroup, and the decisive counter-charges of Wellington’s light cavalry regiments, the Dutch heavy cavalry brigade, and the remaining effectives of the Household Cavalry. At least one artillery officer disobeyed Wellington’s order to seek shelter in the adjacent squares during the charges. Captain Mercer, who commanded ‘G’ Troop, Royal Horse Artillery, thought the Brunswick troops on either side of him so shaky that he kept his battery of six nine-pounders in action against the cavalry throughout, to great effect:
“Captain Cavalie Mercer, RHA,
I thus allowed them to advance unmolested until the head of the column might have been about fifty or sixty yards from us, and then gave the word, “Fire!” The effect was terrible. Nearly the whole leading rank fell at once; and the round shot, penetrating the column carried confusion throughout its extent … the discharge of every gun was followed by a fall of men and horses like that of grass before the mower’s scythe.”
For reasons that remain unclear, no attempt was made to spike other allied guns while they were in French possession. In line with Wellington’s orders, gunners were able to return to their pieces and fire into the French cavalry as they withdrew after each attack. After numerous costly but fruitless attacks on the Mont-Saint-Jean ridge, the French cavalry was spent. Their casualties cannot easily be estimated. Senior French cavalry officers, in particular the generals, experienced heavy losses. Four divisional commanders were wounded, nine brigadiers wounded, and one killed – testament to their courage and their habit of leading from the front. Illustratively, Houssaye reports that the Grenadiers à Cheval numbered 796 of all ranks on 15 June, but just 462 on 19 June, while the Empress Dragoons lost 416 of 816 over the same period. Overall Guyot’s Guard heavy cavalry division lost 47 per cent of its strength.
Eventually it became obvious, even to Ney, that cavalry alone ere achieving little. Belatedly, he organised a combined-arms attack, using Bachelu’s division and Tissot’s regiment of Foy’s division from Reille’s II Corps (about 6,500 infantrymen) plus those French cavalry that remained in a fit state to fight. This assault was directed along much the same route as the previous heavy cavalry attacks. It was halted by a charge of the Household Brigade cavalry led by Uxbridge. The British cavalry were unable, however, to break the French infantry, and fell back with losses from musketry fire. Uxbridge recorded that he tried to lead the Dutch Carabiniers, under Major-General Trip, to renew the attack and that they refused to follow him. Other members of the British cavalry staff also commented on this occurrence. However, there is no support for this incident in Dutch or Belgian sources Meanwhile, Bachelu’s and Tissot’s men and their cavalry supports were being hard hit by fire from artillery and from Adam’s infantry brigade, and they eventually fell back. Although the French cavalry caused few direct casualties to Wellington’s centre, artillery fire onto his infantry squares caused many. Wellington’s cavalry, except for Sir John Vandeleur’s and Sir Hussey Vivian’s brigades on the far left, had all been committed to the fight, and had taken significant losses. The situation appeared so desperate that the Cumberland Hussars, the only Hanoverian cavalry regiment present, fled the field spreading alarm all the way to Brussels
At approximately the same time as Ney’s combined-arms assault on the centre-right of Wellington’s line, rallied elements of D’Erlon’s I Corps, spearheaded by the 13th Légère, renewed the attack on La Haye Sainte, and this time were successful (partly because the defenders’ ammunition ran out). Ney then moved horse artillary up towards Wellington’s centre and began to pulverise the infantry squares at short-range with canister. This all but destroyed the 27th (Inniskilling) Regiment, and the 30th and 73rd Regiments suffered such heavy losses that they had to combine to form a viable square.
“Edward Cotton, 7th Hussars,
The banks on the road side, the garden wall, the knoll and sandpit swarmed with skirmishers, who seemed determined to keep down our fire in front; those behind the artificial bank seemed more intent upon destroying the 27th, who at this time, it may literally be said, were lying dead in square; their loss after La Haye Sainte had fallen was awful, without the satisfaction of having scarcely fired a shot, and many of our troops in rear of the ridge were similarly situated.”
The Arrival of the Prussian IV Corps: Plancenoit
The first Prussian corps to arrive was Bülow’s IV Corps. His objective was Plancenoit, which the Prussians intended to use as a springboard into the rear of the French positions. Blücher intended to secure his right upon Frichermont using the Bois de Paris road.Blücher and Wellington had been exchanging communications since 10:00 and had agreed to this advance on Frichermont if Wellington’s centre was under attack. General Bülow noted that the way to Plancenoit lay open and that the time was 16:30. At about this time, as the French cavalry attack was in full spate, the 15th Brigade IV Corps was sent to link up with the Nassauers of Wellington’s left flank in the Frichermont-La Haie area with the brigade’s horse artillery battery and additional brigade artillery deployed to its left in support. Napoleon sent Lobau’s corps to intercept the rest of Bülow’s IV Corps proceeding to Plancenoit. The 15th Brigade threw Lobau’s troops out of Frichermont with a determined bayonet charge, then proceeded up the Frichermont heights, battering French Chasseurs with 12-pounder artillery fire, and pushed on to Plancenoit. This sent Lobau’s corps into retreat to the Plancenoit area, and in effect drove Lobau past the rear of the Armee Du Nord’s right flank and directly threatened its only line of retreat. Hiller’s 16th Brigade also pushed forward with six battalions against Plancenoit. Napoleon had dispatched all eight battalions of the Young Guard to reinforce Lobau, who was now seriously pressed. The Young Guard counter-attacked and, after very hard fighting, secured Plancenoit, but were themselves counter-attacked and driven out. Napoleon sent two battalions of the Middle/Old Guard into Plancenoit and after ferocious bayonet fighting – they did not deign to fire their muskets – this force recaptured the village.
Zieten`s flank march
Situation from 17:30 to 20:00
Throughout the late afternoon, Zieten’s I Corps had been arriving in greater strength in the area just north of La Haie. General Müffling, Prussian liaison to Wellington, rode to meet I Corps. Zieten had by this time brought up his 1st Brigade, but had become concerned at the sight of stragglers and casualties, from the Nassau units on Wellington’s left and from the Prussian 15th Brigade. These troops appeared to be withdrawing, and Zieten, fearing that his own troops would be caught up in a general retreat, was starting to move away from Wellington’s flank and towards the Prussian main body near Plancenoit. Müffling saw this movement away and persuaded Zieten to support Wellington’s left flank. Zieten resumed his march to support Wellington directly, and the arrival of his troops allowed Wellington to reinforce his crumbling centre by moving cavalry from his left. I Corps proceeded to attack the French troops before Papelotte and by 19:30, the French position was bent into a rough horseshoe shape. The ends of the line were now based on Hougoumont on the left, Plancenoit on the right, and the centre on La Haie. Durutte had taken the positions of La Haie and Papelotte in a series of attacks,but now retreated behind Smohain without opposing the Prussian 24th Regiment as it retook both. The 24th advanced against the new French position, was repulsed, and returned to the attack supported by Silesian Schützen (riflemen) and the F/1st Landwehr. The French initially fell back before the renewed assault, but now began seriously to contest ground, attempting to regain Smohain and hold on to the ridgeline and the last few houses of Papelotte. The 24th Regiment linked up with a Highlander battalion on its far right and along with the 13th Landwehr regiment and cavalry support threw the French out of these positions. Further attacks by the 13th Landwehrand the 15th Brigade drove the French from Frichermont. Durutte’s division, finding itself about to be charged by massed squadrons of Zieten’s I Corps cavalry reserve, retreated from the battlefield. I Corps then advanced to the Brussels road and the only line of retreat available to the French.
Attack of the Imperial Guard
Meanwhile, with Wellington’s centre exposed by the fall of La Haye Sainte, and the Plancenoit front temporarily stabilised, Napoleon committed his last reserve, the hitherto-undefeated Imperial Guard. This attack, mounted at around 19:30, was intended to break through Wellington’s centre and roll up his line away from the Prussians. Although it is one of the most celebrated passages of arms in military history, it is unclear which units actually participated. It appears that it was mounted by five battalions of the Middle Guard, and not by the Grenadiers or Chasseurs of the Old Guard.
” Marshal M. Ney,
I saw four regiments of the middle guard, conducted by the Emperor, arriving. With these troops, he wished to renew the attack, and penetrate the centre of the enemy. He ordered me to lead them on; generals, officers and soldiers all displayed the greatest intrepidity; but this body of troops was too weak to resist, for a long time, the forces opposed to it by the enemy, and it was soon necessary to renounce the hope which this attack had, for a few moments, inspired.”
Three Old Guard battalions did move forward and formed the attack’s second line, though they remained in reserve and did not directly assault the allied line. Marching through a hail of canister and skirmisher fire, the 3,000 or so Middle Guardsmen advanced to the west of La Haye Sainte, and in so doing, separated into three distinct attack forces. One, consisting of two battalions of Grenadiers, defeated Wellington’s first line of British, Brunswick and Nassau troops and marched on. Chasse’s relatively fresh Dutch division was sent against them and a battery of Dutch horse-artillery, commanded by captain Krahmer de Bichin fired into the victorious Grenadiers’ flank. This still could not stop the Guard’s advance, so Chassé ordered his first brigade (colonel Detmers) to charge the outnumbered French with the bayonet, who faltered and broke.
British 10th Hussars of Vivian’s Brigade (red shakos – blue uniforms) attacking mixed French troops, including a square of Guard grenadiers (left, middle distance) in the final stages of the battle.
Further to the west, 1,500 British Foot Guards under Maitland were lying down to protect themselves from the French artillery. As two battalions of Chasseurs approached, the second prong of the Imperial Guard’s attack, Maitland’s guardsmen rose and devastated them with point-blank volleys. The Chasseurs deployed to answer the fire, but began to waver. A bayonet charge by the Foot Guards then broke them. The third prong, a fresh Chasseur battalion, now came up in support. The British guardsmen retired with these Chasseurs in pursuit, but the latter were halted as the 52nd Light Infantry led by John Colbourne wheeled in line onto their flank and poured a devastating fire into them and then charged. Under this onlaught they too broke.
The last of the Guard retreated headlong. A ripple of panic passed through the French lines as the astounding news spread: “La Garde recule. Sauve qui peut!” (“The Guard retreats. Save yourself if you can!”). Wellington now stood up in Copenhagen`s stirrups, and waved his hat in the air to signal a general advance. His army rushed forward from the lines and threw themselves upon the retreating French.
The surviving Imperial Guard rallied on their three reserve battalions (some sources say four) just south of La Haye Sainte, for a last stand. A charge from Adam`s Brigade and the Hanoverian Landwehr Osnabrück Battalion, plus Vivian’s and Vandeleur’s relatively fresh cavalry brigades to their right, threw them into confusion. Those left in semi-cohesive units retreated towards La Belle Alliance. It was during this retreat that some of the Guards were invited to surrender, eliciting the famous, if apocryphal, retort “La Garde meurt, elle ne se rend pas!” (“The Guard dies, it does not surrender!”).
Capture of Plancenoit
At about the same time, the Prussian 5th, 14th, and 16th Brigades were starting to push through Plancenoit, in the third assault of the day.The church was by now on fire, while its graveyard—the French centre of resistance—had corpses strewn about “as if by a whirlwind”.Five Guard battalions were deployed in support of the Young Guard, virtually all of which was now committed to the defence, along with remnants of Lobau’s corps.The key to the Plancenoit position proved to be the Chantelet woods to the south. Pirch’s II Corps had arrived with two brigades and reinforced the attack of IV Corps, advancing through the woods. The 25th Regiment’s musketeer battalions threw the 1/2e Grenadiers (Old Guard) out of the Chantelet woods, outflanking Plancenoit and forcing a retreat. The Old Guard retreated in good order until they met the mass of troops retreating in panic, and became part of that rout.The Prussian IV Corps advanced beyond Plancenoit to find masses of French retreating in disorder from British pursuit.The Prussians were unable to fire for fear of hitting Wellington’s units. This was the fifth and final time that Plancenoit changed hands. French forces not retreating with the Guard were surrounded in their positions and eliminated, neither side asking for nor offering quarter. The French Young Guard Division reported 96 per cent casualties, and two-thirds of Lobau’s Corps ceased to exist.
Despite their great courage and stamina, the French Guards fighting in the village began to show signs of wavering. The church was already on fire with columns of red flame coming out of the windows, aisles and doors. In the village itself, still the scene of bitter house-to-house fighting, everything was burning, adding to the confusion. However, once Major von Witzleben’s manoeuver was accomplished and the French Guards saw their flank and rear threatened, they began to withdraw. The Guard Chasseurs under General Peletformed the rearguard. The remnants of the Guard left in a great rush, leaving large masses of artillery, equipment and ammunition wagons in the wake of their retreat. The evacuation of Plancenoit led to the loss of the position that was to be used to cover the withdrawal of the French Army to Charleroi. The Guard fell back from Plancenoit in the direction of Maison du Roi and Caillou. Unlike other parts of the battlefield, there were no cries of “Sauve qui peut!” here. Instead the cry “Sauvons nos aigles!” (“Let’s save our eagles!”) could be heard.
—Official History of the 25th Regiment, 4 Corps,
Disintegration
The French right, left, and centre had all now failed. The last cohesive French force consisted of two battalions of the Old Guard stationed around La Belle Alliance; the final reserve and personal bodyguard for Napoleon. He hoped to rally the French army behind them, but as retreat turned into rout, they too were forced to withdraw, one on either side of La Belle Alliance, in square as protection against Coalition cavalry. Until persuaded that the battle was lost and he should leave, Napoleon commanded the square to the left of the inn. Adam’s Brigade charged and forced back this square, while the Prussians engaged the other. As dusk fell, both squares withdrew in relatively good order, but the French artillery and everything else fell into the hands of the allies. The retreating Guards were surrounded by thousands of fleeing, broken French troops. Coalition cavalry harried the fugitives until about 23:00, with Gneisenau pursuing them as far as Genappe before ordering a halt. There, Napoleon’s abandoned carriage was captured, still containing diamonds left in the rush. These became part of King Friedrich Wilhelm of Prussia’s crown jewels; one Major Keller of the F/15th received the Pour le Merite with oak leaves for the feat. By this time 78 guns and 2,000 prisoners had also been taken, including more generals.
There remained to us still four squares of the Old Guard to protect the retreat. These brave grenadiers, the choice of the army, forced successively to retire, yielded ground foot by foot, till, overwhelmed by numbers, they were almost entirely annihilated. From that moment, a retrograde movement was declared, and the army formed nothing but a confused mass. There was not, however, a total rout, nor the cry of sauve qui peut, as has been calumniously stated in the bulletin.
—Marshal M. Ney,
In the middle of the position occupied by the French army, and exactly upon the height, is a farm (sic), called La Belle Alliance. The march of all the Prussian columns was directed towards this farm, which was visible from every side. It was there that Napoleon was during the battle; it was thence that he gave his orders, that he flattered himself with the hopes of victory; and it was there that his ruin was decided. There, too, it was that, by happy chance, Field Marshal Blücher and Lord Wellington met in the dark, and mutually saluted each other as victors.
—General Gneisenau,
Historian Perter Hofschroerhas written that Wellington and Blücher met at Genappe around 22:00, signifying the end of the battle.Other sources have recorded that the meeting took place around 21:00 near Napoleon’s former headquarters at La Belle Alliance.
Aftermath
Waterloo cost Wellington around 15,000 dead or wounded, and Blücher some 7,000 (810 of which were suffered by just one unit, the 18th Regiment, which served in Bülow’s 15th Brigade, had fought at both Fichermont and Plancenoit, and won 33 iron Crosses.Napoleon lost 25,000 dead or wounded, with 8,000 taken prisoner.
22 June. This morning I went to visit the field of battle, which is a little beyond the village of Waterloo, on the plateau of Mont-Saint-Jean; but on arrival there the sight was too horrible to behold. I felt sick in the stomach and was obliged to return. The multitude of carcasses, the heaps of wounded men with mangled limbs unable to move, and perishing from not having their wounds dressed or from hunger, as the Allies were, of course, obliged to take their surgeons and waggons with them, formed a spectacle I shall never forget. The wounded, both of the Allies and the French, remain in an equally deplorable state.
—Major W. E. Frye After Waterloo: Reminiscences of European Travel 1815–1819.
At 10:30 on 19 June General Grouchy, still following his orders, defeated General Thielemann at Wavreand withdrew in good order though at the cost of 33,000 French troops that never reached the Waterloo battlefield. Wellington sent his official dispatch describing the battle to England on 19 June 1815, and it arrived in London on 21 June 1815 and was published as a London Gazette Extraordinary on 22 June. Wellington, Blücher and other Coalition forces advanced upon Paris. Napoleon announced his second abdication on 24 June 1815. In the final skirmish of the Napoleonic Wars, Marshal Davout, Napoleon’s minister of war, was defeated by Blücher at Issy on 3 July 1815. Allegedly, Napoleon tried to escape to North America, but the Royal Navy was blockading French ports to forestall such a move. He finally surrendered to Captain Frederick Maitland of HMS Bellerophon on 15 July. There was a campaign against French fortresses that still held out; Longwy capitulated on 13 September 1815, the last to do so. The Treaty of Paris was signed on 20 November 1815. Louise XVIII was restored to the throne of France, and Napoleon was exiled to Saint Helena, where he died in 1821.
Royal Highness, – Exposed to the factions which divide my country, and to the enmity of the great Powers of Europe, I have terminated my political career; and I come, like Themistocles, to throw myself upon the hospitality (m’asseoir sur le foyer) of the British people. I claim from your Royal Highness the protections of the laws, and throw myself upon the most powerful, the most constant, and the most generous of my enemies.
—Napoleon. (letter of surrender to the Prince Regent; translation),
Maitland’s 1st Foot Guards, who had defeated the Chasseurs of the Guard, were thought to have defeated the Grenadiers; they were awarded the title of Grenadier Guardsin recognition of their feat, and adopted bearskins in the style of the Grenadiers. Britain’s Household Cavalry likewise adopted the cuirass in 1821 in recognition of their success against their armoured French counterparts. The effectiveness of the lance was noted by all participants and this weapon subsequently became more widespread throughout Europe; the British converted their first light cavalry regiment to lancers in 1816, their uniforms, of Polish origin, were based on those of the Imperial Guard Lancers.
The Historical Importance of Waterloo
Waterloo was a decisive battle in more than one sense. It definitively ended the series of wars that had convulsed Europe, and involved many other regions of the world, since the French Revolution of the early 1790s. It also ended the political and military career of Napoleon Bonaparte, imperial monarchistand one of the greatest commanders and statesmen in history.Finally, it ushered in almost half a century of international peace in Europe; no further major conflict occurred until the Crimean War.
A French View of the reasons for Napoleons Defeat
General Antoine-Henri, Baron of Jomini one of the leading military writers on the Napoleonic art of war, had a number of very cogent explanations of the reasons behind Napoleon’s defeat at Waterloo.
In my opinion, four principal causes led to this disaster:
The first, and most influential, was the arrival, skilfully combined, of Blücher, and the false movement that favoured this arrival;the second, was the admirable firmness of the British infantry, joined to the sang-froid and aplomb of its chiefs; the third, was the horrible weather, that had softened the ground, and rendered the offensive movements so toilsome, and retarded till one o’clock the attack that should have been made in the morning; the fourth, was the inconceivable formation of the first corps, in masses very much too deep for the first grand attack.
The Battlefield Today
Some portions of the terrain on the battlefield have been altered from their 1815 appearance. Tourism began the day after the battle, with Captain Mercer noting that on 19 June “a carriage drove on the ground from Brussels, the inmates of which, alighting, proceeded to examine the field”.In 1820, the Netherlands’ King William Iordered the construction of a monument on the spot where it was believed his son, the Prince of Orange, had been wounded. The Lion`s Hillock, a giant mound, was constructed here, using 300,000 cubic metres (390,000 cu yd) of earth taken from the ridge at the centre of the British line which effectively removed the southern bank of Wellington’s sunken road.
Every one is aware that the variously inclined undulations of the plains, where the engagement between Napoleon and Wellington took place, are no longer what they were on 18 June 1815. By taking from this mournful field the wherewithal to make a monument to it, its real relief has been taken away, and history, disconcerted, no longer finds her bearings there. It has been disfigured for the sake of glorifying it. Wellington, when he beheld Waterloo once more, two years later, exclaimed, “They have altered my field of battle!” Where the great pyramid of earth, surmounted by the lion, rises to-day, there was a hillock which descended in an easy slope towards the Nivelles road, but which was almost an escarpment on the side of the highway to Genappe. The elevation of this escarpment can still be measured by the height of the two knolls of the two great sepulchres which enclose the road from Genappe to Brussels: one, the English tomb, is on the left; the other, the German tomb, is on the right. There is no French tomb. The whole of that plain is a sepulchre for France.
Other terrain features and notable landmarks on the field have remained virtually unchanged since the battle. These include the rolling farmland to the east of the Brussels-Charleroi Road as well as the buildings at Hougoumont, La Haye Sainte, and La Belle Alliance.
Apart from the Lion Mound, there are several more conventional but noteworthy monuments throughout the battlefield. A cluster of monuments at the Brussels-Charleroi and Braine L’Alleud-Ohain crossroads marks the mass graves of British, Dutch, Hanoverian and King`s German Legion troops. A monument to the French dead, entitled L’aigle Blessé (“The Wounded Eagle”), marks the location where it is believed one of the Imperial Guard units formed a square during the closing moments of the battle. A monument to the Prussian dead is located in the village of Plancenoit on the site where one of their artillery batteries took position. The Duhesme mausoleum is one among the few graves of the fallen. It is located at the side of Saint Martin’s Church in Ways, a hamlet in the municipality of Genappe. Seventeen fallen officers are buried in the crypt of the British Monument in the Brussels Cemetery in Evere.The remains of an unknown soldier were discovered in 2012. He was a slightly hunchbacked infantryman, 1.60 metres (5.2 ft) tall, and was hit in the chest by a French bullet. His rifle, coins, and position on the battlefield led experts to believe he was Hanoverian.


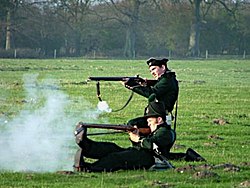


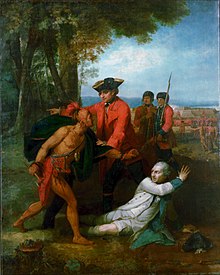


")


")


_-_Waterloo_1.jpg)